Plate Style Plate Style |
|---|
|
Surface Plate Grade Surface Plate Grade |
|---|
|
Mobility Mobility |
|---|
|
For Plate Style For Plate Style |
|---|
|
RoHS (Restriction of Hazardous Substances) RoHS (Restriction ofHazardous Substances) |
|---|
|
REACH (Registration, Evaluation, Authorization and Restriction of Chemicals) REACH (Registration,Evaluation, Authorization and Restriction of Chemicals) |
|---|
|
DFARS (Defense Acquisition Regulations Supplement) DFARS (Defense AcquisitionRegulations Supplement) |
|---|
Specifications Met Specifications Met |
|---|
|
Load Capacity Load Capacity |
|---|
|
|
Container Type Container Type |
|---|
| Bottle | Jug | Spray Bottle |
Container Size Container Size |
|---|
|
For Removing For Removing |
|---|
|
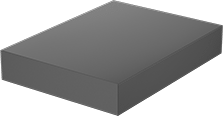
Granite Flat-Surface Plates


Corrosion resistant and nonmagnetic, these smooth plates also resist warping and abrasion. The extremely tight flatness tolerances provide an accurate reference plane for layout and inspection work.
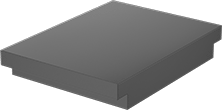
Plates with two ledges are used to hold fixtures and instruments with clamps.
Laboratory Grade AA plates are for precision quality control work.
Inspection Grade A plates are for general quality control work.
Toolroom Grade B plates are for checking work throughout a shop.
Also Available: Other plate sizes. Please order 2245A999 and specify grade, length, width, thickness, and with or without ledges.
For technical drawings and 3-D models, click on a part number.
Plates | Plate Covers | |||||||||||
|---|---|---|---|---|---|---|---|---|---|---|---|---|
| Lg. | Wd. | Ht. | Flatness Tolerance | Color | Specifications Met | Certification | Specifications Met | Wt., lbs. | Each | Each | ||
Rectangular | ||||||||||||
Laboratory Grade AA | ||||||||||||
| 12" | 8" | 2" | 0.00005" | Black | ASME B89.3.7, Fed. Spec. GGG-P-463C, ISO 10012 | Certificate of Accuracy Traceable to NIST | ASME B89.3.7, Fed. Spec. GGG-P-463C, ISO 10012 | 28 | 0000000 | 0000000 | 00000000 | 000000 |
| 18" | 12" | 4" | 0.00005" | Black | ASME B89.3.7, Fed. Spec. GGG-P-463C, ISO 10012 | Certificate of Accuracy Traceable to NIST | ASME B89.3.7, Fed. Spec. GGG-P-463C, ISO 10012 | 93 | 0000000 | 000000 | 00000000 | 00000 |
| 24" | 18" | 4" | 0.000075" | Black | ASME B89.3.7, Fed. Spec. GGG-P-463C, ISO 10012 | Certificate of Accuracy Traceable to NIST | ASME B89.3.7, Fed. Spec. GGG-P-463C, ISO 10012 | 185 | 0000000 | 000000 | 00000000 | 000000 |
| 36" | 24" | 6" | 0.0001" | Black | ASME B89.3.7, Fed. Spec. GGG-P-463C, ISO 10012 | Certificate of Accuracy Traceable to NIST | ASME B89.3.7, Fed. Spec. GGG-P-463C, ISO 10012 | 601 | 0000000 | 00000000 | 00000000 | 000000 |
| 48" | 36" | 6" | 0.0002" | Black | ASME B89.3.7, Fed. Spec. GGG-P-463C, ISO 10012 | Certificate of Accuracy Traceable to NIST | ASME B89.3.7, Fed. Spec. GGG-P-463C, ISO 10012 | 1,203 | 0000000 | 00000000 | 00000000 | 000000 |
Inspection Grade A | ||||||||||||
| 12" | 8" | 2" | 0.0001" | Black | ASME B89.3.7, Fed. Spec. GGG-P-463C, ISO 10012 | Certificate of Accuracy Traceable to NIST | ASME B89.3.7, Fed. Spec. GGG-P-463C, ISO 10012 | 28 | 0000000 | 000000 | 00000000 | 00000 |
| 18" | 12" | 4" | 0.0001" | Black | ASME B89.3.7, Fed. Spec. GGG-P-463C, ISO 10012 | Certificate of Accuracy Traceable to NIST | ASME B89.3.7, Fed. Spec. GGG-P-463C, ISO 10012 | 93 | 0000000 | 000000 | 00000000 | 00000 |
| 24" | 18" | 4" | 0.00015" | Black | ASME B89.3.7, Fed. Spec. GGG-P-463C, ISO 10012 | Certificate of Accuracy Traceable to NIST | ASME B89.3.7, Fed. Spec. GGG-P-463C, ISO 10012 | 185 | 0000000 | 000000 | 00000000 | 000000 |
| 36" | 24" | 6" | 0.0002" | Black | ASME B89.3.7, Fed. Spec. GGG-P-463C, ISO 10012 | Certificate of Accuracy Traceable to NIST | ASME B89.3.7, Fed. Spec. GGG-P-463C, ISO 10012 | 555 | 0000000 | 00000000 | 00000000 | 000000 |
| 48" | 36" | 6" | 0.0004" | Black | ASME B89.3.7, Fed. Spec. GGG-P-463C, ISO 10012 | Certificate of Accuracy Traceable to NIST | ASME B89.3.7, Fed. Spec. GGG-P-463C, ISO 10012 | 1,110 | 0000000 | 00000000 | 00000000 | 000000 |
Toolroom Grade B | ||||||||||||
| 12" | 8" | 2" | 0.0002" | Black | ASME B89.3.7, Fed. Spec. GGG-P-463C, ISO 10012 | Certificate of Accuracy Traceable to NIST | ASME B89.3.7, Fed. Spec. GGG-P-463C, ISO 10012 | 21 | 0000000 | 000000 | 00000000 | 00000 |
| 18" | 12" | 3" | 0.0002" | Black | ASME B89.3.7, Fed. Spec. GGG-P-463C, ISO 10012 | Certificate of Accuracy Traceable to NIST | ASME B89.3.7, Fed. Spec. GGG-P-463C, ISO 10012 | 70 | 0000000 | 000000 | 00000000 | 00000 |
| 24" | 18" | 3" | 0.0003" | Black | ASME B89.3.7, Fed. Spec. GGG-P-463C, ISO 10012 | Certificate of Accuracy Traceable to NIST | ASME B89.3.7, Fed. Spec. GGG-P-463C, ISO 10012 | 139 | 0000000 | 000000 | 00000000 | 000000 |
| 36" | 24" | 4" | 0.0004" | Black | ASME B89.3.7, Fed. Spec. GGG-P-463C, ISO 10012 | Certificate of Accuracy Traceable to NIST | ASME B89.3.7, Fed. Spec. GGG-P-463C, ISO 10012 | 370 | 0000000 | 000000 | 00000000 | 000000 |
| 48" | 36" | 6" | 0.0008" | Black | ASME B89.3.7, Fed. Spec. GGG-P-463C, ISO 10012 | Certificate of Accuracy Traceable to NIST | ASME B89.3.7, Fed. Spec. GGG-P-463C, ISO 10012 | 1,203 | 0000000 | 00000000 | 00000000 | 000000 |
Rectangular with Two Ledges | ||||||||||||
Laboratory Grade AA | ||||||||||||
| 18" | 12" | 4" | 0.00005" | Black | ASME B89.3.7, Fed. Spec. GGG-P-463C, ISO 10012 | Certificate of Accuracy Traceable to NIST | ASME B89.3.7, Fed. Spec. GGG-P-463C, ISO 10012 | 83 | 0000000 | 000000 | 00000000 | 00000 |
| 24" | 18" | 4" | 0.000075" | Black | ASME B89.3.7, Fed. Spec. GGG-P-463C, ISO 10012 | Certificate of Accuracy Traceable to NIST | ASME B89.3.7, Fed. Spec. GGG-P-463C, ISO 10012 | 175 | 0000000 | 000000 | 00000000 | 000000 |
Inspection Grade A | ||||||||||||
| 18" | 12" | 4" | 0.0001" | Black | ASME B89.3.7, Fed. Spec. GGG-P-463C, ISO 10012 | Certificate of Accuracy Traceable to NIST | ASME B89.3.7, Fed. Spec. GGG-P-463C, ISO 10012 | 83 | 0000000 | 000000 | 00000000 | 00000 |
| 24" | 18" | 4" | 0.00015" | Black | ASME B89.3.7, Fed. Spec. GGG-P-463C, ISO 10012 | Certificate of Accuracy Traceable to NIST | ASME B89.3.7, Fed. Spec. GGG-P-463C, ISO 10012 | 175 | 0000000 | 000000 | 00000000 | 000000 |
| 36" | 24" | 6" | 0.0002" | Black | ASME B89.3.7, Fed. Spec. GGG-P-463C, ISO 10012 | Certificate of Accuracy Traceable to NIST | ASME B89.3.7, Fed. Spec. GGG-P-463C, ISO 10012 | 530 | 0000000 | 00000000 | 00000000 | 000000 |
| 48" | 36" | 6" | 0.0004" | Black | ASME B89.3.7, Fed. Spec. GGG-P-463C, ISO 10012 | Certificate of Accuracy Traceable to NIST | ASME B89.3.7, Fed. Spec. GGG-P-463C, ISO 10012 | 1,063 | 0000000 | 00000000 | 00000000 | 000000 |
Toolroom Grade B | ||||||||||||
| 18" | 12" | 3" | 0.0002" | Black | ASME B89.3.7, Fed. Spec. GGG-P-463C, ISO 10012 | Certificate of Accuracy Traceable to NIST | ASME B89.3.7, Fed. Spec. GGG-P-463C, ISO 10012 | 66 | 0000000 | 000000 | 00000000 | 00000 |
| 24" | 18" | 3" | 0.0003" | Black | ASME B89.3.7, Fed. Spec. GGG-P-463C, ISO 10012 | Certificate of Accuracy Traceable to NIST | ASME B89.3.7, Fed. Spec. GGG-P-463C, ISO 10012 | 130 | 0000000 | 000000 | 00000000 | 000000 |
| 36" | 24" | 4" | 0.0004" | Black | ASME B89.3.7, Fed. Spec. GGG-P-463C, ISO 10012 | Certificate of Accuracy Traceable to NIST | ASME B89.3.7, Fed. Spec. GGG-P-463C, ISO 10012 | 357 | 0000000 | 00000000 | 00000000 | 000000 |
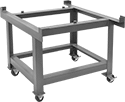
Stands for Granite Flat-Surface Plates


These stands have three plate support points to match the support points on most granite plates as defined by Fed. Spec. GGG-P-463c.
For technical drawings and 3-D models, click on a part number.
For Plate | ||||||||||
|---|---|---|---|---|---|---|---|---|---|---|
| Lg. | Wd. | Ht. | Load Capacity, lbs. | Ht. | Material | Color | Caster Type | For Plate Style | Each | |
Mobile | ||||||||||
| 18" | 12" | 3", 4" | 400 | 36" | Painted Steel | Gray | Two Rigid and Two Swivel with Brakes | 0000000 | 0000000 | |
| 24" | 18" | 3", 4" | 500 | 36" | Painted Steel | Gray | Two Rigid and Two Swivel with Brakes | 0000000 | 00000000 | |
| 36" | 24" | 4", 6" | 1,200 | 36" | Painted Steel | Gray | Two Rigid and Two Swivel with Brakes | 0000000 | 00000000 | |
| 48" | 36" | 6" | 2,400 | 36" | Painted Steel | Gray | Two Rigid and Two Swivel with Brakes | 0000000 | 00000000 | |
Stationary | ||||||||||
| 18" | 12" | 3", 4" | 400 | 36" | Painted Steel | Gray | __ | 0000000 | 000000 | |
| 24" | 18" | 3", 4" | 500 | 36" | Painted Steel | Gray | __ | 0000000 | 000000 | |
| 36" | 24" | 4", 6" | 1,200 | 36" | Painted Steel | Gray | __ | 0000000 | 00000000 | |
| 48" | 36" | 6" | 2,400 | 36" | Painted Steel | Gray | __ | 0000000 | 00000000 | |
Cleaners for Granite Flat-Surface Plates

Remove particles from granite flat-surface plates without leaving a residue.


