


Filter by
Thread Size


Material
Threaded Insert Type
System of Measurement
For Tap Type

Thread Type
For Use In
Helical Insert Style

DFARS Specialty Metals
Export Control Classification Number (ECCN)
REACH
RoHS
End Type
Passivation
Tensile Strength
Thread Spacing
Thread Direction
How to Install Helical Inserts
More
About Helical Insert Length
More
Stainless Steel Helical Inserts
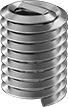
Also known as Heli-Coil inserts, these inserts have coils that expand once installed to securely anchor the insert. All have a prong for ease of installation. An installation tool grips the prong and reduces the coil diameter, enabling the insert to fit in tapped holes. Remove the prong to insert the screw. Installation requires a drill bit, a helical insert tap, an installation tool, and a prong break-off tool.