


Filter by

For Use With
For Valve Control Type
Handle Length
Material
Valve Function
U.S.–Mexico–Canada Agreement (USMCA) Qualifying
DFARS Specialty Metals
Export Control Classification Number (ECCN)
Clamp Material
Valve Handle Lockouts
Style C
 |
Style C (Padlocks Not Included) |
Style C lockouts have a cylinder and end cap that you place over your valve.
Slide-On Cover—Slide-on lockouts fit onto the valve handle; the valve body prevents the handle from turning. All of these lockouts work on closed handles, but some also work on open ones.
For Handle | ||||||||||||
|---|---|---|---|---|---|---|---|---|---|---|---|---|
Lg. | Thk. | Min. Padlock Vert. Shackle Clearance | For Max. No. of Padlocks | For Max. Padlock Shackle Dia. | Temp. Range, ° F | Color | Label Included | Specs. Met | Each | |||
Slide On—Locks in Closed and Open Position | ||||||||||||
Plastic | ||||||||||||
| 1" to 6" | 1/8" to 1 5/8" | 1" | 1 | 9/32" | -20 to 200 | Red | Yes | OSHA Compliant 29 CFR 1910.147 | 45075K77 | 000000 | ||
Style E
 |
Style E (Padlocks Not Included) |
Clamp-On Cover—Clamp-on lockouts adjust to fit a range of handle sizes.
For Handle Thk. | Min. Padlock Vert. Shackle Clearance | For Max. No. of Padlocks | For Max. Padlock Shackle Dia. | Clamp Material | Temp. Range, ° F | Color | Label Included | Specs. Met | Each | |||
|---|---|---|---|---|---|---|---|---|---|---|---|---|
Clamp On—Locks in Closed and Open Position | ||||||||||||
Plastic | ||||||||||||
| 1/8" to 1/2" | 3/4" | 2 | 3/8" | 304 Stainless Steel | 0 to 245 | Red | No | OSHA Compliant 29 CFR 1910.147 | 5095N15 | 000000 | ||
| 1/4" to 1" | 3/4" | 2 | 3/8" | 304 Stainless Steel | 0 to 245 | Red | No | OSHA Compliant 29 CFR 1910.147 | 5095N14 | 00000 | ||
Clamp On—Locks in Closed Position | ||||||||||||
Plastic | ||||||||||||
| 1/8" to 2 1/4" | — | 4 | 1/4" | 304 Stainless Steel | -20 to 140 | Red | No | OSHA Compliant 29 CFR 1910.147 | 5095N11 | 00000 | ||
| 2" to 4" | — | 4 | 1/4" | 304 Stainless Steel | -20 to 140 | Red | No | OSHA Compliant 29 CFR 1910.147 | 5095N12 | 00000 | ||
Style F
 |
Style F (Padlocks Not Included) |
Style F lockouts wedge compression handles, preventing them from being squeezed to stop your valve from operating.
Clamp-On Cover—Clamp-on lockouts adjust to fit a range of handle sizes.
For Handle | ||||||||||||
|---|---|---|---|---|---|---|---|---|---|---|---|---|
Lg. | Thk. | Min. Padlock Vert. Shackle Clearance | For Max. No. of Padlocks | For Max. Padlock Shackle Dia. | Temp. Range, ° F | Color | Label Included | Specs. Met | Each | |||
Clamp On—Locks in Closed Position | ||||||||||||
Plastic | ||||||||||||
| — | 3/4" to 1 1/2" | 1" | 6 | 9/32" | -20 to 200 | Red | Yes | OSHA Compliant 29 CFR 1910.147 | 45075K78 | 000000 | ||
Clamp On | ||||||||||||
Plastic | ||||||||||||
| 3/4" to 2" | — | 3/4" | 2 | 9/32" | 0 to 175 | Red | No | OSHA Compliant 29 CFR 1910.147 | 5095N13 | 00000 | ||
Style G
 |
Style G (Padlocks Not Included) |
Hinged Cover—Hinged lockouts secure the valve handle in any position. They have a one-piece design that stays together for easy storage.
For Handle | ||||||||||||
|---|---|---|---|---|---|---|---|---|---|---|---|---|
Lg. | Thk. | Min. Padlock Vert. Shackle Clearance | For Max. No. of Padlocks | For Max. Padlock Shackle Dia. | Temp. Range, ° F | Color | Label Included | Specs. Met | Each | |||
Hinged—Locks in Closed and Open Position | ||||||||||||
Plastic | ||||||||||||
| 1/2" to 8" | 3/4" to 2" | 3/4" | 4 | 5/16" | -40 to 210 | Red | No | OSHA Compliant 29 CFR 1910.147 | 45075K71 | 000000 | ||
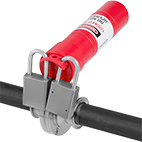
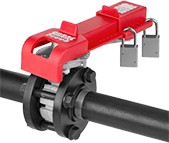
Universal Valve Lockouts
 |  |
Installed on Handle (Padlock Not Included) | Shown with Additional Blocking Arm (Sold Separately) and Padlock (Not Included) |
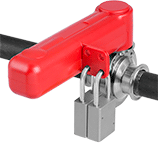
 |  |
Installed on Hand Wheel (Padlock Not Included) |
Lock out most valves in your facility with just one device. These lockouts clamp onto a variety of valve handwheels and handles. They’re great for large levers, T-handles, wheels with odd shapes and sizes, and other handles that are hard to secure with specialized lockouts. However, they’re slower to install than specialized lockouts—you’ll have to configure different attachments depending on your handle type. These lockouts help you comply with OSHA 29 CFR 1910.147 requirements for the control of hazardous energy.
To install, first turn your handle to the off position. After assembling your lockout with all necessary attachments, clamp the body to your handle and turn the lockout wheel to tighten. Add a padlock to prevent removal of the lockout.
Each lockout comes with a blocking arm. Wedge the arm against a pipe or other surface in the direction the handle turns in—this will block its movement. If your handle turns in either direction, attach an additional blocking arm (sold separately).
For valve handles that turn with a squeeze trigger, clamp the lockout body to the handle so it wedges between the handle and the trigger.
For handwheels, clamp the lockout body to the edge of the wheel and run the included cable through the spokes and around a nearby pipe or surface. Then pull the cable through the lockout body for a tight hold.
Nylon Cable—Nylon cable resists corrosion, so it’s good for use in damp areas or on wet or greasy pipes. It also resists many common chemicals. Even as it wears, it won’t scuff surfaces and stays nonconductive.
Vinyl-Coated Metal Cable—Metal cable lasts longer than nylon cable. A vinyl coating protects it from rust and prevents it from scuffing surfaces.
Lockouts | Additional Blocking Arms | ||||||||||||||||
|---|---|---|---|---|---|---|---|---|---|---|---|---|---|---|---|---|---|
Nylon Cable | Vinyl-Coated Metal Cable | ||||||||||||||||
For Handle Thk. | Min. Padlock Vert. Shackle Clearance | For Max. No. of Padlocks | For Max. Padlock Shackle Dia. | Clamp Material | Cable Dia. | Lg., ft. | Temp. Range, ° F | Color | Features | Each | Each | Each | |||||
Clamp On—Locks in Closed Position | |||||||||||||||||
Plastic | |||||||||||||||||
| 1/8" to 1/2" | 3/4" | 2 | 3/8" | Stainless Steel | 1/8" | 8 | 0 to 245 | Red | Blocking Arm | 5897N12 | 0000000 | 5897N11 | 0000000 | 5897N15 | 000000 | ||
| 1/4" to 1" | 3/4" | 2 | 3/8" | Stainless Steel | 1/8" | 8 | 0 to 245 | Red | Blocking Arm | 5897N14 | 000000 | 5897N13 | 000000 | 5897N16 | 00000 | ||
Clamp-On Lockout Cables
 |  |
Padlock Not Included |
More secure than standard lockout cables, these lockouts clamp to a surface nearby, giving you a fixed point to pull the cable tight. Since the body of the lockout doesn’t hang freely like on standard lockout cables, their cable stays taut. After locking out, you can still tighten these cables, but they won’t loosen until you remove all your padlocks and open them up. Clamp them onto anything that fits between their jaws before weaving the cable around the item you’re locking out. They’ll even secure difficult-to-lock devices, such as ball and butterfly valve handles.
With holes for multiple padlocks, each person can add their own as they start a job. Use a hasp in the bottom hole to add more padlocks for larger groups. These cables help you comply with OSHA 29 CFR 1910.147 requirements for locking out controls to prevent injuries. The cable is plastic coated, so it doesn’t scuff up surfaces.
Swap between the included steel and rubber jaws to fit your application. The steel jaws are more durable and will last longer. The rubber jaws are a better choice for delicate surfaces because they won’t leave scratches.
Cable | Body | |||||||||||||||
|---|---|---|---|---|---|---|---|---|---|---|---|---|---|---|---|---|
For Max. No. of Padlocks | For Max. Padlock Shackle Dia. | Max. Jaw Opening | Cable Dia. | Lg., ft. | Material | Lg. | Wd. | Thk. | Color | Includes | Label Included | Specs. Met | Each | |||
Lockout Cable | ||||||||||||||||
Plastic | ||||||||||||||||
| 4 | 9/32" | 2 3/4" | 1/8" | 8 | Plastic-Coated Steel | 8 5/8" | 7" | 2 5/8" | Red | Interchangeable Steel and Rubber Jaws | No | OSHA Compliant 29 CFR 1910.147 | 6554N11 | 000000 | ||
