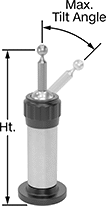
Calibration Spheres for CMMs
Test your coordinate measuring machine (CMM) probe and stylus against a precise reference point before you start inspecting. These spheres come with a calibration certificate traceable to UKAS (United Kingdom Accreditation Service) that confirms their accuracy. Made of tungsten carbide, they won’t lose their precise shape or size over time.
To prepare your probe for different inspection angles, adjust the angle of the sphere. For example, if you need to measure underneath a part, angle these spheres down to 45°. They rotate 360° even when angled. They snap into place when they’re perfectly vertical, the most common position. After you’ve positioned these spheres how you want, lock them in place by tightening the collar. Each time you adjust the sphere, you’ll need to recalibrate your probe and stylus.
Smaller spheres are best for probes with smaller stylus ends. As a rule of thumb, you should use the 25 mm dia. sphere for any stylus with an end diameter over 2 mm.
Mounting studs (sold separately) are required to mount to your CMM’s table or to a quick-change fixture plate. These plates take the work out of threading a sphere in and out of your table every time you calibrate.
For technical drawings and 3-D models, click on a part number.

Ball | Base | |||||||||||
|---|---|---|---|---|---|---|---|---|---|---|---|---|
| Dia., mm | Sphericity Tolerance, mm | Dia. Tolerance, mm | Material | Ht., mm | Dia., mm | Material | Rotation | Max. Tilt Angle | Certification | Container Type | Each | |
| 12 | -0.0001 to 0.0001 | -0.001 to 0.001 | Tungsten Carbide | 156-173 | 57 | Aluminum | 360° | 45° | Calibration Certificate with Test Data Traceable to UKAS | Plastic Case | 0000000 | 0000000 |
| 25 | -0.0001 to 0.0001 | -0.001 to 0.001 | Tungsten Carbide | 156-173 | 57 | Aluminum | 360° | 45° | Calibration Certificate with Test Data Traceable to UKAS | Plastic Case | 0000000 | 000000 |


