


Filter by
Thread Size
Threaded Insert Type
Material


For Tap Thread Size
Thread Direction
For Tap Type


End Type
Passivation
Military Specification
Export Control Classification Number (ECCN)
DFARS Specialty Metals

Key-Locking Threaded Inserts for Soft Metal
 |
Add strong threads in soft metal, such as aluminum. The keys on these inserts drive into holes to hold more securely than thread-locking or helical inserts. They prevent slipping and rotating, so they’re stable enough for use in vehicle or aerospace parts that experience heavy vibration. These inserts are comparable to Keensert inserts.
To install, drill and tap a hole in your material. Then, thread the insert onto the installation tool and screw it into the hole. Place the tool over the keys and hit it with a hammer to drive them in.
Thin Wall—Use these inserts near the edge of workpieces or wherever you only have space for a small hole. They're also lighter than standard and extra-thick wall inserts for applications with strict weight limitations.
18-8 Stainless Steel—The choice for wet and outdoor environments, these inserts resist rust and mild chemicals.
Helical Threaded Insert Removal Tools
 |
For Thread Size | Mfr. | Each | |||
|---|---|---|---|---|---|
Standard Profile | |||||
| 2-56, 3-48, 3-56, 4-40, 4-48, 5-40, 6-32, 6-40, 8-32, 8-36, M2, M2.2, M2.5, M3, M3.5, M4 | — | 90254A111 | 000000 | ||
| 4-40, 4-48, 5-40, 6-32, 6-40, 8-32, 8-36, 10-24, 10-32, 12-24, 1/4"-20, 1/4"-28, 3/8"-16, M3, M3.5, M4, M5, M6, M7, M8, M9, M10 | — | 90254A112 | 00000 | ||
| 6-32, 6-40, 8-32, 8-36, 10-24, 10-32, 12-24, 1/4"-20, 1/4"-28, 5/16"-18, 5/16"-24, 3/8"-16, 3/8"-24, 7/16"-14, 7/16"-20, 1/2"-13, 1/2"-20, 9/16"-12, 9/16"-18, 5/8"-11, 5/8"-18, 3/4"-10, 3/4"-16, 7/8"-9, 7/8"-14, 1"-8, 1"-12, 1"-14, M4, M5, M6, M7, M8, M9, M10, M12, M13, M14, M15, M16, M18, M20, M22, M24 | — | 90254A113 | 00000 | ||
Narrow Profile | |||||
| 3-48, 3-56, 4-40, 4-48, 5-40, 5-44, 6-32, 6-40, 8-32, 8-36, 8-40, M2.5, M3, M3.5, M4 | Heli-Coil | 90254A310 | 00000 | ||
Spring-Loaded Helical Threaded Insert Prong Break-Off Tools
Screw-Locking Helical Threaded Inserts
 |
Pronged |
The irregularly shaped threads tightly grip screws to prevent them from loosening or backing out under vibration. Use these inserts to create or repair threads in pumps and other machinery that shakes and rattles. Also known as Heli-Coil inserts.
Installation requires a drill bit, a helical insert tap, and an installation tool.
Pronged—The prong attaches to an installation tool for precise control as you drive inserts in. Remove the prong with a punch or break-off tool before inserting a screw.
18-8 Stainless Steel—The choice for wet and outdoor environments, these inserts resist rust and mild chemicals.
Inserts | Through-Hole Taps | Closed-End Hole Taps | Installation Tools | Prong Break-Off Tools | |||||||||||||
|---|---|---|---|---|---|---|---|---|---|---|---|---|---|---|---|---|---|
Thread Size | Installed Lg. | Drill Bit Size | For Max. Hole Dia. | Specs. Met | Pkg. Qty. | Pkg. | Each | Each | Each | Each | |||||||
Pronged | |||||||||||||||||
18-8 Stainless Steel | |||||||||||||||||
| 6-40 | 0.138" | 25 Ga. | 0.150" | MS21209F0610, NASM21209 | 10 | 90296A024 | 00000 | 91709A063 | 000000 | 91709A419 | 000000 | 90261A106 | 0000000 | 92955A105 | 000000 | ||
| 6-40 | 0.207" | 25 Ga. | 0.150" | MS21209F0615, NASM21209 | 5 | 90296A189 | 0000 | 91709A063 | 00000 | 91709A419 | 00000 | 90261A106 | 000000 | 92955A105 | 00000 | ||
| 6-40 | 0.276" | 25 Ga. | 0.150" | MS21209F0620, NASM21209 | 5 | 90296A190 | 0000 | 91709A063 | 00000 | 91709A419 | 00000 | 90261A106 | 000000 | 92955A105 | 00000 | ||
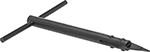
Key-Locking Threaded Insert Installation Tools
Style B |
Thread inserts and drive down their keys with a single tool. These tools are compatible with Keensert inserts.
Helical Threaded Inserts
 |
Pronged |
Restore, reinforce, or create threads in metal. The tough coils on these inserts expand once installed to anchor in a tapped hole. Also known as Heli-Coil inserts, they're often used in engine heads and machinery housings where strong connections are critical. Unlike threadlocking inserts, you can remove and reuse them without them losing their strength.
Installation requires a drill bit, a helical insert tap, and an installation tool.
Pronged—The prong attaches to an installation tool for precise control as you drive inserts in. Remove the prong with a punch or break-off tool before inserting a screw.
18-8 Stainless Steel—The choice for wet and outdoor environments, these inserts resist rust and mild chemicals.
Inserts | Through-Hole Taps | Closed-End Hole Taps | Installation Tools | Prong Break-Off Tools | |||||||||||||
|---|---|---|---|---|---|---|---|---|---|---|---|---|---|---|---|---|---|
Thread Size | Installed Lg. | Drill Bit Size | For Max. Hole Dia. | Specs. Met | Pkg. Qty. | Pkg. | Each | Each | Each | Each | |||||||
Pronged | |||||||||||||||||
18-8 Stainless Steel | |||||||||||||||||
| 6-40 | 0.138" | 25 Ga. | 0.150" | MS124653 | 10 | 91732A012 | 00000 | 91709A063 | 000000 | 91709A419 | 000000 | 90261A106 | 0000000 | 92955A105 | 000000 | ||
| 6-40 | 0.207" | 25 Ga. | 0.150" | MS124693 | 10 | 91732A014 | 0000 | 91709A063 | 00000 | 91709A419 | 00000 | 90261A106 | 000000 | 92955A105 | 00000 | ||
| 6-40 | 0.276" | 25 Ga. | 0.150" | MS124733 | 10 | 91732A710 | 0000 | 91709A063 | 00000 | 91709A419 | 00000 | 90261A106 | 000000 | 92955A105 | 00000 | ||
Helical Insert Taps
Swage-Locking Threaded Inserts
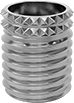 |  |
Add strong threads to the edges of soft metal without bulging or cracking the material. These inserts have thinner walls than our key-locking and thread-locking inserts, so they don’t need as much space around them. The knurls press (swage) into the material to keep inserts in place when you tighten or loosen a screw.
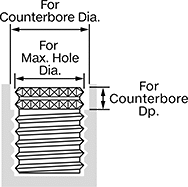
To install these inserts, you need a drill bit, a counterbore, a standard tap, an installation tool, and a hammer. Drill a hole, counterbore the top, and tap it. Place the insert into the installation tool, then hand-tighten it into the tapped hole. Strike the tool to secure the insert and drive the knurls into the surrounding material.
High-Strength 17-4 PH Stainless Steel—The strongest stainless steel inserts we offer. They handle high-stress installations, such as pump and compressor housings, and the heavy vibration of aircraft parts. They won’t rust in wet and outdoor environments but can’t withstand the harsh chemicals and acids that 316 stainless steel can.
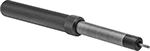
Easy-Start Helical Threaded Insert Installation Tools
Threaded Insert Installation Tools with Depth Stop
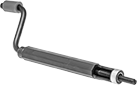 |  |
Crank Handle | Threaded Drive |
Ensure consistent installation across multiple inserts. Set your desired installation depth, and the stop will prevent you from driving your insert any further.
Threaded Drive Helical Insert Tool—These tools align each coil of your insert perfectly with the thread pitch of your tapped hole for easy installation.
Screw-Locking Seize-Resistant Key-Locking Threaded Inserts for Soft Metal
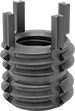 |
Create the tightest hold in aluminum and other soft metal without screws sticking. The lubricant on these inserts eases installation, and the irregularly shaped threads won’t let screws back out from vibration. Inserts have keys that drive into material to prevent them from slipping or rotating in the hole.
To install, drill and tap a hole in your material. Then, thread the insert onto the installation tool and screw it into the hole. Place the tool over the keys and hit it with a hammer to drive them in.
Thin Wall—Use these inserts near the edge of workpieces or wherever you only have space for a small hole. They're also lighter than standard and extra-thick wall inserts for applications with strict weight limitations.
Dry-Film-Lubricated 18-8 Stainless Steel—The choice for wet and outdoor environments, these inserts resist rust and mild chemicals.
Seize-Resistant Swage-Locking Threaded Inserts
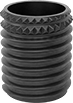 | |
Smoothly install these inserts for strong threads near the edges and corners of soft metal surfaces. They’re lubricated to prevent sticking as you thread them in. Since these have thinner walls than our key-locking and thread-locking inserts, they don’t need as much space and won't bulge or crack the material. The knurls press (swage) into the material to keep inserts in place when you tighten or loosen a screw.
To install these inserts, you need a drill bit, a counterbore, a standard tap, an installation tool, and a hammer. Drill a hole, counterbore the top, and tap it. Place the insert into the installation tool, then hand-tighten it into the tapped hole. Strike the tool to secure the insert and drive the knurls into the surrounding material.
High-Strength Dry-Film-Lubricated Cadmium-Plated Alloy Steel—Stronger than our 17-4 PH stainless steel inserts, these inserts absorb impact without cracking and stand up to high-pressure applications. The cadmium plating prevents corrosion in wet environments.
%20--%3e%3cg%3e%3cg%20id='Layer_1'%3e%3cpath%20class='cls-1'%20d='M68,27.2c-14.6,0-26.4,11.7-26.4,26.3,0,7,2.8,13.7,7.7,18.7v44.8l18.8-16.1,18.7,16.1v-44.9c10.3-10.3,10.3-27,0-37.3-5-4.9-11.7-7.7-18.7-7.7h0ZM81.3,105l-13.2-11.4-13.2,11.4v-28.7c8.2,4.8,18.3,4.8,26.5,0v28.7ZM76.2,70.8c-5.2,2.5-11.2,2.5-16.4,0-9.5-4.5-13.5-15.9-9-25.4,4.5-9.5,15.9-13.5,25.4-9,9.5,4.5,13.5,15.9,9,25.4-1.9,4-5.1,7.1-9,9Z'/%3e%3cpath%20class='cls-2'%20d='M5.8,95.5c-1.2,0-2.1-1-2.1-2.1,0,0,0,0,0,0V29.4h20.9c2.1,0,3.8-1.7,3.8-3.8V3.7c.2,0,.4,0,.5,0h37.5c1.2,0,2.1,1,2.1,2.1v18.6c1.2,0,2.5.1,3.7.3V5.8C72.2,2.6,69.6,0,66.4,0H28.9c-1.5,0-3,.6-4.1,1.7h-.1c0,.1-23,23.2-23,23.2-1.1,1.1-1.7,2.6-1.7,4.1v64.3c0,3.2,2.6,5.8,5.8,5.8h41.7v-3.7H5.8ZM24.7,7.1v18.7H6L24.7,7.1Z'/%3e%3c/g%3e%3c/g%3e%3c/svg%3e)
Certificates with a traceable lot number are available for these products. Download certificates from ORDER HISTORY after your order ships.
Helical Threaded Insert Assortments with Installation Tools
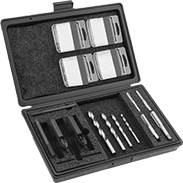 |
Repair damaged threads or create new ones. These convenient assortments include helical inserts, an installation tool for each thread size, a drill bit, and a tap. The inserts are also known as Heli-Coil inserts.
Pronged—The prong attaches to an installation tool for precise control as you drive inserts in. Remove the prong with a punch or break-off tool before inserting a screw.
18-8 Stainless Steel—The choice for wet and outdoor environments, these inserts resist rust and mild chemicals.
No. of Inserts Included | Includes | Thread Spacing | Drill Bit Size | For Max. Hole Dia. | Each | |||
|---|---|---|---|---|---|---|---|---|
Pronged | ||||||||
18-8 Stainless Steel | ||||||||
| 36 | 6-40 Thread × 0.138" Installed Lg. (12 Each) 6-40 Thread × 0.207" Installed Lg. (12 Each) 6-40 Thread × 0.276" Installed Lg. (12 Each) Drill Bit Installation Tool Prong Break-Off Tool Through-Hole Tap | Fine | 25 Ga. | 0.150" | 91732A907 | 0000000 | ||
Air-Powered Helical Threaded Insert Installation Tools
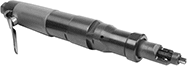 |
Install standard and prongless helical inserts in high-volume production and assembly. Powered by compressed air, these tools deliver more force than electric tools. Use them to install a wide range of insert sizes. Press the lever to install the insert, then release to reverse out. These tools require a nosepiece and nosepiece adapter (both sold separately).
Air Inlet | ||||||||||
|---|---|---|---|---|---|---|---|---|---|---|
Threaded Insert Tool Cycle Time, sec. | Max. Speed @ 90 psi, rpm | Overall Lg. | Wt., lb. | Average Air Consumption @ Pressure | Pipe Size | Thread Type | Gender | Each | ||
| 5 | 1,500 | 5 3/4" | 0.9 | 14.4 ft³/min @ 90 psi | 1/4 | NPT | Female | 8868N11 | 000000000 | |
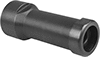
 |
For Thread Size | Each | ||
|---|---|---|---|
| 2-56, 4-40, M2.5, M3 | 8868N14 | 0000000 |
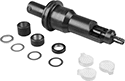 |
Compress the insert’s diameter and align each coil with the thread pitch to easily install the insert straight into a tapped hole. They work with loose and strip-feed inserts. Also known as prewinders.
For Pronged Helical Inserts | For Prongless Helical Inserts | |||||||
|---|---|---|---|---|---|---|---|---|
For Thread Size | For Use With | Max. Air Pressure, psi | Each | Max. Air Pressure, psi | Each | |||
| 2-56 | Helical Inserts, Screw-Locking Helical Inserts | 20 | 8868N35 | 0000000 | 15 | 8868N15 | 0000000 | |
| 4-40 | Helical Inserts, Screw-Locking Helical Inserts | 20 | 8868N36 | 000000 | 20 | 8868N16 | 000000 | |
| 6-32 | Helical Inserts, Screw-Locking Helical Inserts | 30 | 8868N37 | 000000 | 30 | 8868N17 | 000000 | |
| 8-32 | Helical Inserts, Screw-Locking Helical Inserts | 40 | 8868N38 | 000000 | 30 | 8868N18 | 000000 | |
| 10-24 | Helical Inserts, Screw-Locking Helical Inserts | 40 | 8868N39 | 000000 | 40 | 8868N19 | 000000 | |
| 10-32 | Helical Inserts, Screw-Locking Helical Inserts | 40 | 8868N45 | 000000 | 30 | 8868N24 | 000000 | |
| 1/4"-20 | Helical Inserts, Screw-Locking Helical Inserts | 45 | 8868N41 | 000000 | 45 | 8868N21 | 000000 | |
| 1/4"-28 | Helical Inserts, Screw-Locking Helical Inserts | 45 | 8868N46 | 000000 | 45 | 8868N25 | 000000 | |
| 5/16"-18 | Helical Inserts, Screw-Locking Helical Inserts | 50 | 8868N42 | 000000 | 50 | 8868N22 | 000000 | |
| 5/16"-24 | Helical Inserts, Screw-Locking Helical Inserts | 50 | 8868N47 | 000000 | 50 | 8868N26 | 000000 | |
| 3/8"-16 | Helical Inserts, Screw-Locking Helical Inserts | 60 | 8868N43 | 000000 | 60 | 8868N23 | 000000 | |
| 3/8"-24 | Helical Inserts, Screw-Locking Helical Inserts | 60 | 8868N48 | 000000 | 60 | 8868N27 | 000000 | |
| 7/16"-20 | Helical Inserts, Screw-Locking Helical Inserts | 50 | 8868N49 | 000000 | — | ——— | 0 | |
| 1/2"-13 | Helical Inserts, Screw-Locking Helical Inserts | 80 | 8868N44 | 000000 | — | ——— | 0 | |
| 1/2"-20 | Helical Inserts, Screw-Locking Helical Inserts | 80 | 8868N51 | 000000 | — | ——— | 0 | |
| M2.5 × 0.45 mm | Helical Inserts, Screw-Locking Helical Inserts | 20 | 8868N52 | 000000 | 15 | 8868N28 | 000000 | |
| M3 × 0.5 mm | Helical Inserts, Screw-Locking Helical Inserts | 30 | 8868N53 | 000000 | 20 | 8868N29 | 000000 | |
| M4 × 0.7 mm | Helical Inserts, Screw-Locking Helical Inserts | 40 | 8868N54 | 000000 | 30 | 8868N31 | 000000 | |
| M5 × 0.8 mm | Helical Inserts, Screw-Locking Helical Inserts | 40 | 8868N55 | 000000 | 30 | 8868N32 | 000000 | |
| M6 × 1 mm | Helical Inserts, Screw-Locking Helical Inserts | 45 | 8868N56 | 000000 | 40 | 8868N33 | 000000 | |
| M8 × 1 mm | Helical Inserts, Screw-Locking Helical Inserts | 50 | 8868N58 | 000000 | — | ——— | 0 | |
| M8 × 1.25 mm | Helical Inserts, Screw-Locking Helical Inserts | 50 | 8868N57 | 000000 | 50 | 8868N34 | 000000 | |
| M10 × 1.5 mm | Helical Inserts, Screw-Locking Helical Inserts | 50 | 8868N59 | 000000 | — | ——— | 0 | |
| M12 × 1.75 mm | Helical Inserts, Screw-Locking Helical Inserts | 60 | 8868N61 | 000000 | — | ——— | 0 | |
 |
For Thread Size | Each | |||
|---|---|---|---|---|
For Prongless Helical Inserts | ||||
| 2-56 | 91049A702 | 000000 | ||
| 4-40 | 91049A705 | 00000 | ||
| 6-32 | 91049A708 | 00000 | ||
| 8-32 | 91049A711 | 00000 | ||
| 10-24 | 91049A714 | 00000 | ||
| 10-32 | 91049A914 | 00000 | ||
| 1/4"-20 | 91049A720 | 00000 | ||
| 1/4"-28 | 91049A209 | 00000 | ||
| 5/16"-18 | 91049A207 | 00000 | ||
| 5/16"-24 | 91049A210 | 00000 | ||
| 3/8"-16 | 91049A208 | 00000 | ||
| 3/8"-24 | 91049A211 | 00000 | ||
| M2.5 × 0.45 mm | 91049A750 | 00000 | ||
| M3 × 0.5 mm | 91049A752 | 00000 | ||
| M4 × 0.7 mm | 91049A754 | 00000 | ||
| M5 × 0.8 mm | 91049A756 | 00000 | ||
| M6 × 1 mm | 91049A758 | 00000 | ||
| M8 × 1.25 mm | 91049A204 | 00000 | ||
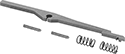
Helical Threaded Insert Installation and Prong Break-Off Tools
L-Handle |
For Thread Size | Handle Style | Each | |||
|---|---|---|---|---|---|
| 6-32, 6-40, M3.5 × 0.6 mm | L-Handle | 92450A173 | 000000 | ||
Punch-Style Helical Threaded Insert Prong Break-Off Tools
For Thread Size | Handle Style | For Use With | Each | ||
|---|---|---|---|---|---|
| 6-32, 6-40, M3.5 | Straight | Helical Inserts, Screw-Locking Helical Inserts | 1231N13 | 00000 |
