Filter by
Mounting Location
Width
Current per Circuit
Electrical Connection
Maximum Temperature
Height
Performance
Grounding
Certification
DFARS Specialty Metals
Export Control Classification Number (ECCN)
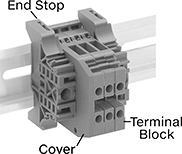
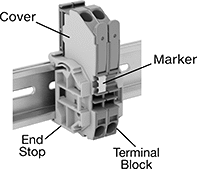
Modular DIN-Rail Mount Terminal Blocks
Terminal Blocks with Screw-Clamp Terminals
Terminal Blocks | Covers | End Stops | Bar Jumpers | ||||||||||||||||||||||||||||||||||||||||||||||||||||||||||||||||||||||||||||||||||||||||||||||||
|---|---|---|---|---|---|---|---|---|---|---|---|---|---|---|---|---|---|---|---|---|---|---|---|---|---|---|---|---|---|---|---|---|---|---|---|---|---|---|---|---|---|---|---|---|---|---|---|---|---|---|---|---|---|---|---|---|---|---|---|---|---|---|---|---|---|---|---|---|---|---|---|---|---|---|---|---|---|---|---|---|---|---|---|---|---|---|---|---|---|---|---|---|---|---|---|---|---|---|---|
Each | |||||||||||||||||||||||||||||||||||||||||||||||||||||||||||||||||||||||||||||||||||||||||||||||||||
No. of Circuits | No. of Terminals per Circuit | For Wire Ga. | Wd., mm | Ht., mm | For DIN Rail Trade Size | Enclosure Rating | Choose a Color | 1-24 | 25-Up | Each | Each | Insulation | Each | ||||||||||||||||||||||||||||||||||||||||||||||||||||||||||||||||||||||||||||||||||||||
630V AC/630V DC—24 amp per Circuit | |||||||||||||||||||||||||||||||||||||||||||||||||||||||||||||||||||||||||||||||||||||||||||||||||||
| 2 | 2 | 22 to 12 | 5 | 65.5 | 1, 3 | IP20 | Beige | 00000000 | 00000 | 00000 | 0000000 | 00000 | 00000000 | 00000 | Insulated | 00000000 | 000000 | ||||||||||||||||||||||||||||||||||||||||||||||||||||||||||||||||||||||||||||||||||
| 2 | 2 | 22 to 12 | 5 | 65.5 | 1, 3 | IP20 | Blue | 00000000 | 0000 | 0000 | 0000000 | 0000 | 00000000 | 0000 | Insulated | 00000000 | 00000 | ||||||||||||||||||||||||||||||||||||||||||||||||||||||||||||||||||||||||||||||||||
| 2 | 2 | 22 to 12 | 5 | 65.5 | 1, 3 | IP20 | Gray | 00000000 | 0000 | 0000 | 0000000 | 0000 | 00000000 | 0000 | Insulated | 00000000 | 00000 | ||||||||||||||||||||||||||||||||||||||||||||||||||||||||||||||||||||||||||||||||||
800V AC—32 amp per Circuit | |||||||||||||||||||||||||||||||||||||||||||||||||||||||||||||||||||||||||||||||||||||||||||||||||||
| 2 | 2 | 22 to 12 | 6 | 65.5 | 1, 3 | IP20 | Beige , Black , Blue , Gray , Green , Orange , Red , White , Yellow | 0000000 | 0000 | 0000 | 0000000 | 0000 | 0000000 | 0000 | Noninsulated | 0000000 | 00000 | ||||||||||||||||||||||||||||||||||||||||||||||||||||||||||||||||||||||||||||||||||
800V AC—41 amp per Circuit | |||||||||||||||||||||||||||||||||||||||||||||||||||||||||||||||||||||||||||||||||||||||||||||||||||
| 2 | 2 | 18 to 8 | 8 | 88 | 1, 3 | IP20 | Gray | 00000000 | 0000 | 0000 | 00000000 | 0000 | 0000000 | 0000 | Noninsulated | 0000000 | 00000 | ||||||||||||||||||||||||||||||||||||||||||||||||||||||||||||||||||||||||||||||||||
Fuse Terminal Blocks with Screw-Clamp Terminals
Terminal Blocks | Covers | End Stops | Bar Jumpers | ||||||||||||||||||||||||||||||||||||||||||||||||||||||||||||||||||||||||||||||||||||||||||||||||
|---|---|---|---|---|---|---|---|---|---|---|---|---|---|---|---|---|---|---|---|---|---|---|---|---|---|---|---|---|---|---|---|---|---|---|---|---|---|---|---|---|---|---|---|---|---|---|---|---|---|---|---|---|---|---|---|---|---|---|---|---|---|---|---|---|---|---|---|---|---|---|---|---|---|---|---|---|---|---|---|---|---|---|---|---|---|---|---|---|---|---|---|---|---|---|---|---|---|---|---|
For Fuse | Each | ||||||||||||||||||||||||||||||||||||||||||||||||||||||||||||||||||||||||||||||||||||||||||||||||||
No. of Circuits | No. of Terminals per Circuit | For Wire Ga. | Wd., mm | Ht., mm | Overall Dia., mm | Overall Lg., mm | Type | Circuit Status Indicator Type | Blown Fuse Indicator Voltage | For DIN Rail Trade Size | Enclosure Rating | Color | 1-24 | 25-Up | Each | Each | Insulation | Each | |||||||||||||||||||||||||||||||||||||||||||||||||||||||||||||||||||||||||||||||||
300V AC/300V DC—6.3 amp per Circuit | |||||||||||||||||||||||||||||||||||||||||||||||||||||||||||||||||||||||||||||||||||||||||||||||||||
| 2 1 (Ground) | 2 1 (Ground) | 20 to 12 | 8 | 99 | 5 | 20 | Ceramic, Glass | — | — | 3 | IP20 | Gray | 00000000 | 000000 | 000000 | 00000000 | 00000 | 00000000 | 00000 | Noninsulated | 0000000 | 000000 | |||||||||||||||||||||||||||||||||||||||||||||||||||||||||||||||||||||||||||||
| 2 1 (Ground) | 2 1 (Ground) | 20 to 12 | 8 | 99 | 5 | 20 | Ceramic, Glass | Blown Fuse | 24V DC 60V DC 110V AC | 3 | IP20 | Gray | 00000000 | 00000 | 00000 | 00000000 | 0000 | 00000000 | 0000 | Noninsulated | 0000000 | 00000 | |||||||||||||||||||||||||||||||||||||||||||||||||||||||||||||||||||||||||||||
| 2 1 (Ground) | 2 1 (Ground) | 20 to 12 | 8 | 99 | 5 | 20 | Ceramic, Glass | Blown Fuse | 110V AC 230V AC | 3 | IP20 | Gray | 00000000 | 00000 | 00000 | 00000000 | 0000 | 00000000 | 0000 | Noninsulated | 0000000 | 00000 | |||||||||||||||||||||||||||||||||||||||||||||||||||||||||||||||||||||||||||||
600V AC—6.3 amp per Circuit | |||||||||||||||||||||||||||||||||||||||||||||||||||||||||||||||||||||||||||||||||||||||||||||||||||
| 2 | 2 | 24 to 12 | 8 | 85.5 | 5 | 20 | Ceramic, Glass | Blown Fuse | 110V AC 230V AC | 1, 3 | IP20 | Gray | 00000000 | 00000 | 00000 | 00000000 | 0000 | 00000000 | 0000 | Insulated | 00000000 | 00000 | |||||||||||||||||||||||||||||||||||||||||||||||||||||||||||||||||||||||||||||
| 2 | 2 | 12 | 8 | 85.5 | 5 | 20 | Ceramic, Glass | Blown Fuse | 24V AC 24V DC | 1, 3 | IP20 | Gray | 00000000 | 00000 | 00000 | 00000000 | 0000 | 00000000 | 0000 | Insulated | 00000000 | 00000 | |||||||||||||||||||||||||||||||||||||||||||||||||||||||||||||||||||||||||||||
630V AC/630V DC—6.3 amp per Circuit | |||||||||||||||||||||||||||||||||||||||||||||||||||||||||||||||||||||||||||||||||||||||||||||||||||
| 2 | 2 | 24 to 12 | 8 | 85.5 | 5 | 20 | Ceramic, Glass | — | — | 1, 3 | IP20 | Gray | 00000000 | 00000 | 00000 | 00000000 | 0000 | 00000000 | 0000 | Insulated | 00000000 | 00000 | |||||||||||||||||||||||||||||||||||||||||||||||||||||||||||||||||||||||||||||
Terminal Blocks
 |
Terminal Blocks | Covers | Markers | |||||||||||||||||||||||||||||||||||||||||||||||||||||||||||||||||||||||||||||||||||||||||||||||||
|---|---|---|---|---|---|---|---|---|---|---|---|---|---|---|---|---|---|---|---|---|---|---|---|---|---|---|---|---|---|---|---|---|---|---|---|---|---|---|---|---|---|---|---|---|---|---|---|---|---|---|---|---|---|---|---|---|---|---|---|---|---|---|---|---|---|---|---|---|---|---|---|---|---|---|---|---|---|---|---|---|---|---|---|---|---|---|---|---|---|---|---|---|---|---|---|---|---|---|---|
Mounting Holes | |||||||||||||||||||||||||||||||||||||||||||||||||||||||||||||||||||||||||||||||||||||||||||||||||||
No. of Circuits | For Wire Ga. | Wire Connection | Terminal Size | Terminal Ctr.-to-Ctr. | Lg. | Wd. | Ht. | Max. Temp., ° F | Color | For DIN Rail Trade Size | Dia. | No. of | Each | Each | Each | ||||||||||||||||||||||||||||||||||||||||||||||||||||||||||||||||||||||||||||||||||||
300V AC/300V DC—20 amp per Circuit | |||||||||||||||||||||||||||||||||||||||||||||||||||||||||||||||||||||||||||||||||||||||||||||||||||
| 2 | 22 to 12 | Screw Terminal | No. 6 | 3/8" | 1 7/16" | 7/8" | 1/2" | 257 | Black | — | 0.17" | 4 | 0000000 | 00000 | 00000000 | 00000 | 00000000 | 00000 | |||||||||||||||||||||||||||||||||||||||||||||||||||||||||||||||||||||||||||||||||
300V AC/300V DC—30 amp per Circuit | |||||||||||||||||||||||||||||||||||||||||||||||||||||||||||||||||||||||||||||||||||||||||||||||||||
| 2 | 22 to 12 | Screw Terminal | No. 6 | 7/16" | 1 5/8" | 1 1/8" | 1/2" | 257 | Black | — | 0.18" | 4 | 0000000 | 0000 | 00000000 | 0000 | 00000000 | 0000 | |||||||||||||||||||||||||||||||||||||||||||||||||||||||||||||||||||||||||||||||||
600V AC/600V DC—20 amp per Circuit | |||||||||||||||||||||||||||||||||||||||||||||||||||||||||||||||||||||||||||||||||||||||||||||||||||
| 2 | 22 to 12 | Screw Terminal | No. 6 | 7/16" | 1 5/8" | 1 3/8" | 3/4" | 257 | Black | — | 0.18" | 4 | 0000000 | 0000 | 00000000 | 0000 | 00000000 | 0000 | |||||||||||||||||||||||||||||||||||||||||||||||||||||||||||||||||||||||||||||||||
600V AC/600V DC—30 amp per Circuit | |||||||||||||||||||||||||||||||||||||||||||||||||||||||||||||||||||||||||||||||||||||||||||||||||||
| 2 | 14 to 12 | Screw Terminal | No. 8 | 9/16" | 2 1/8" | 1 5/16" | 11/16" | 257 | Black | — | 0.22" | 4 | 0000000 | 0000 | 00000000 | 0000 | 00000000 | 0000 | |||||||||||||||||||||||||||||||||||||||||||||||||||||||||||||||||||||||||||||||||
600V AC/600V DC—75 amp per Circuit | |||||||||||||||||||||||||||||||||||||||||||||||||||||||||||||||||||||||||||||||||||||||||||||||||||
| 2 | 14 to 6 | Screw Terminal | No. 10 | 11/16" | 2 1/2" | 1 13/16" | 3/4" | 266 | Black | — | 0.22" | 4 | 00000000 | 00000 | ——— | 0 | ——— | 0 | |||||||||||||||||||||||||||||||||||||||||||||||||||||||||||||||||||||||||||||||||
600V AC/600V DC—200 amp per Circuit | |||||||||||||||||||||||||||||||||||||||||||||||||||||||||||||||||||||||||||||||||||||||||||||||||||
| 2 | 14 to 2 | Stud Terminal | 1/4" | 13/16" | 1 7/8" | 3" | 2 7/16" | 257 | Black | 3 | 0.22" | 4 | 0000000 | 00000 | ——— | 0 | ——— | 0 | |||||||||||||||||||||||||||||||||||||||||||||||||||||||||||||||||||||||||||||||||
High-Temperature Terminal Blocks
Mounting Holes | |||||||||||||||||||||||||||||||||||||||||||||||||||||||||||||||||||||||||||||||||||||||||||||||||||
|---|---|---|---|---|---|---|---|---|---|---|---|---|---|---|---|---|---|---|---|---|---|---|---|---|---|---|---|---|---|---|---|---|---|---|---|---|---|---|---|---|---|---|---|---|---|---|---|---|---|---|---|---|---|---|---|---|---|---|---|---|---|---|---|---|---|---|---|---|---|---|---|---|---|---|---|---|---|---|---|---|---|---|---|---|---|---|---|---|---|---|---|---|---|---|---|---|---|---|---|
No. of Circuits | For Wire Ga. | Wire Connection | Terminal Size | Terminal Ctr.-to-Ctr. | Lg. | Wd. | Ht. | Max. Temp., ° F | Material | Color | Dia. | No. of | Each | ||||||||||||||||||||||||||||||||||||||||||||||||||||||||||||||||||||||||||||||||||||||
300V AC/300V DC—20 amp per Circuit | |||||||||||||||||||||||||||||||||||||||||||||||||||||||||||||||||||||||||||||||||||||||||||||||||||
| 2 | 24 to 12 | Screw Terminal | M3 | 5/16" | 11/16" | 15/16" | 3/4" | 1,200 | Ceramic | White | — | — | 0000000 | 00000 | |||||||||||||||||||||||||||||||||||||||||||||||||||||||||||||||||||||||||||||||||||||
| 2 | 24 to 12 | Screw Terminal | M3 | 1/2" | 15/16" | 15/16" | 3/4" | 1,200 | Ceramic | White | 0.14" | 2 | 0000000 | 0000 | |||||||||||||||||||||||||||||||||||||||||||||||||||||||||||||||||||||||||||||||||||||
300V AC/300V DC—30 amp per Circuit | |||||||||||||||||||||||||||||||||||||||||||||||||||||||||||||||||||||||||||||||||||||||||||||||||||
| 2 | 22 to 10 | Screw Terminal | M4 | 9/16" | 1" | 1" | 3/4" | 1,200 | Ceramic | White | 0.14" | 2 | 0000000 | 0000 | |||||||||||||||||||||||||||||||||||||||||||||||||||||||||||||||||||||||||||||||||||||
300V AC/300V DC—65 amp per Circuit | |||||||||||||||||||||||||||||||||||||||||||||||||||||||||||||||||||||||||||||||||||||||||||||||||||
| 2 | 18 to 6 | Screw Terminal | M4 | 11/16" | 1 1/4" | 1 1/8" | 15/16" | 1,200 | Ceramic | White | 0.14" | 2 | 0000000 | 0000 | |||||||||||||||||||||||||||||||||||||||||||||||||||||||||||||||||||||||||||||||||||||
600V AC/600V DC—20 amp per Circuit | |||||||||||||||||||||||||||||||||||||||||||||||||||||||||||||||||||||||||||||||||||||||||||||||||||
| 2 | 20 to 12 | Screw-Clamp Terminal | No. 8 | 7/8" | 1 9/16" | 1 1/4" | 13/16" | 840 | Ceramic | Beige | 0.19" | 1 | 0000000 | 00000 | |||||||||||||||||||||||||||||||||||||||||||||||||||||||||||||||||||||||||||||||||||||
Quick-Connect Terminal Blocks
Terminal Blocks | DIN Rail Mounting Adapters | |||||||||||||||||
|---|---|---|---|---|---|---|---|---|---|---|---|---|---|---|---|---|---|---|
Mounting Holes | Black | White | ||||||||||||||||
No. of Circuits | No. of Terminals per Circuit | For Wire Ga. | Wire Connection | Terminal Ctr.-to-Ctr. | Lg. | Wd. | Ht. | Max. Temp., ° F | For DIN Rail Trade Size | Dia. | No. of | Each | Each | Each | ||||
| 2 | 4 | 20 to 12 | Spring-Clamp Terminal | 1/2" | 15/16" | 7/8" | 1 3/8" | 221 | 3 | 0.13" | 1 | 0000000 | 00000 | 0000000 | 00000 | 000000 | 00000 | |
Harsh-Environment High-Current Distribution Bars
Distribution Bars | Distribution Bar Covers | ||||||||||||||||||||||||||||||||||||||||||||||||||||||||||||||||||||||||||||||||||||||||||||||||||
|---|---|---|---|---|---|---|---|---|---|---|---|---|---|---|---|---|---|---|---|---|---|---|---|---|---|---|---|---|---|---|---|---|---|---|---|---|---|---|---|---|---|---|---|---|---|---|---|---|---|---|---|---|---|---|---|---|---|---|---|---|---|---|---|---|---|---|---|---|---|---|---|---|---|---|---|---|---|---|---|---|---|---|---|---|---|---|---|---|---|---|---|---|---|---|---|---|---|---|---|
Stud Terminals | Screw Terminals | Mounting Holes | |||||||||||||||||||||||||||||||||||||||||||||||||||||||||||||||||||||||||||||||||||||||||||||||||
Voltage | Current | No. per Circuit | Size | No. per Circuit | Size | Lg. | Wd. | Ht. | Mounting Fasteners Included | Dia. | No. of | Certification | Each | Each | |||||||||||||||||||||||||||||||||||||||||||||||||||||||||||||||||||||||||||||||||||||
Screw Terminals | |||||||||||||||||||||||||||||||||||||||||||||||||||||||||||||||||||||||||||||||||||||||||||||||||||
2 Circuits | |||||||||||||||||||||||||||||||||||||||||||||||||||||||||||||||||||||||||||||||||||||||||||||||||||
| 300V AC 48V DC | 100 amp 100 amp | — | — | 5 | No. 8 | 3" | 1 13/16" | 9/16" | No | 0.21" | 2 | CE Marked | 0000000 | 000000 | 0000000 | 000000 | |||||||||||||||||||||||||||||||||||||||||||||||||||||||||||||||||||||||||||||||||||
| 300V AC 48V DC | 100 amp 100 amp | — | — | 10 | No. 8 | 5 1/16" | 1 13/16" | 9/16" | No | 0.21" | 2 | CE Marked | 0000000 | 00000 | 0000000 | 00000 | |||||||||||||||||||||||||||||||||||||||||||||||||||||||||||||||||||||||||||||||||||
Stud and Screw Terminals | |||||||||||||||||||||||||||||||||||||||||||||||||||||||||||||||||||||||||||||||||||||||||||||||||||
2 Circuits | |||||||||||||||||||||||||||||||||||||||||||||||||||||||||||||||||||||||||||||||||||||||||||||||||||
| 300V AC 48V DC | 130 amp 150 amp | 2 | 1/4" | 5 | No. 10 | 4 7/8" | 2 9/16" | 1 1/4" | No | 0.21" | 2 | CE Marked | 0000000 | 00000 | ——— | 0 | |||||||||||||||||||||||||||||||||||||||||||||||||||||||||||||||||||||||||||||||||||
Quick-Connect Modular DIN-Rail Mount Terminal Blocks
Terminal Blocks with Spring-Clamp Terminals
Terminal Blocks | Covers | End Stops | Adjacent Jumpers | Alternate Jumpers | |||||||||||||||||||||||||||||||||||||||||||||||||||||||||||||||||||||||||||||||||||||||||||||||
|---|---|---|---|---|---|---|---|---|---|---|---|---|---|---|---|---|---|---|---|---|---|---|---|---|---|---|---|---|---|---|---|---|---|---|---|---|---|---|---|---|---|---|---|---|---|---|---|---|---|---|---|---|---|---|---|---|---|---|---|---|---|---|---|---|---|---|---|---|---|---|---|---|---|---|---|---|---|---|---|---|---|---|---|---|---|---|---|---|---|---|---|---|---|---|---|---|---|---|---|
Each | |||||||||||||||||||||||||||||||||||||||||||||||||||||||||||||||||||||||||||||||||||||||||||||||||||
No. of Circuits | No. of Terminals per Circuit | For Wire Ga. | Wd., mm | Ht., mm | For DIN Rail Trade Size | Choose a Color | 1-24 | 25-Up | Each | Each | Insulation | Each | Insulation | Each | |||||||||||||||||||||||||||||||||||||||||||||||||||||||||||||||||||||||||||||||||||||
300V AC/300V DC—15 amp per Circuit | |||||||||||||||||||||||||||||||||||||||||||||||||||||||||||||||||||||||||||||||||||||||||||||||||||
| 2 | 2 | 28 to 12 | 5 | 64 | 3 | Blue , Gray | 00000000 | 00000 | 00000 | 00000000 | 00000 | 00000000 | 00000 | Insulated | 00000000 | 00000 | Insulated | 00000000 | 00000 | ||||||||||||||||||||||||||||||||||||||||||||||||||||||||||||||||||||||||||||||||
600V AC/600V DC—20 amp per Circuit | |||||||||||||||||||||||||||||||||||||||||||||||||||||||||||||||||||||||||||||||||||||||||||||||||||
| 2 | 2 | 28 to 12 | 6 | 73.5 | 3 | Blue , Gray | 00000000 | 00000 | 0000 | 00000000 | 0000 | 00000000 | 0000 | Insulated | 00000000 | 0000 | Insulated | 00000000 | 0000 | ||||||||||||||||||||||||||||||||||||||||||||||||||||||||||||||||||||||||||||||||
Touch-Safe Terminal Blocks
Mounting Holes | |||||||||||||||||||||||||||||||||||||||||||||||||||||||||||||||||||||||||||||||||||||||||||||||||||
|---|---|---|---|---|---|---|---|---|---|---|---|---|---|---|---|---|---|---|---|---|---|---|---|---|---|---|---|---|---|---|---|---|---|---|---|---|---|---|---|---|---|---|---|---|---|---|---|---|---|---|---|---|---|---|---|---|---|---|---|---|---|---|---|---|---|---|---|---|---|---|---|---|---|---|---|---|---|---|---|---|---|---|---|---|---|---|---|---|---|---|---|---|---|---|---|---|---|---|---|
Style | No. of Circuits | For Wire Ga. | Wire Connection | Terminal Size | Terminal Ctr.-to-Ctr. | Lg. | Wd. | Ht. | Max. Temp., ° F | Color | Dia. | No. of | Each | ||||||||||||||||||||||||||||||||||||||||||||||||||||||||||||||||||||||||||||||||||||||
600V AC/600V DC—20 amp per Circuit | |||||||||||||||||||||||||||||||||||||||||||||||||||||||||||||||||||||||||||||||||||||||||||||||||||
| A | 2 | 22 to 12 | Screw-Clamp Terminal | M3 | 5/16" | 1/2" | 3/4" | 3/4" | 221 | White | 0.12" | 1 | 00000000 | 00000 | |||||||||||||||||||||||||||||||||||||||||||||||||||||||||||||||||||||||||||||||||||||
600V AC/600V DC—30 amp per Circuit | |||||||||||||||||||||||||||||||||||||||||||||||||||||||||||||||||||||||||||||||||||||||||||||||||||
| A | 2 | 18 to 10 | Screw-Clamp Terminal | M3 | 3/8" | 11/16" | 3/4" | 13/16" | 221 | White | 0.15" | 1 | 00000000 | 0000 | |||||||||||||||||||||||||||||||||||||||||||||||||||||||||||||||||||||||||||||||||||||
600V AC/600V DC—40 amp per Circuit | |||||||||||||||||||||||||||||||||||||||||||||||||||||||||||||||||||||||||||||||||||||||||||||||||||
| A | 2 | 20 to 8 | Screw-Clamp Terminal | M3 | 1/2" | 13/16" | 15/16" | 7/8" | 221 | White | 0.17" | 1 | 00000000 | 0000 | |||||||||||||||||||||||||||||||||||||||||||||||||||||||||||||||||||||||||||||||||||||
600V AC/600V DC—63 amp per Circuit | |||||||||||||||||||||||||||||||||||||||||||||||||||||||||||||||||||||||||||||||||||||||||||||||||||
| A | 2 | 14 to 6 | Screw-Clamp Terminal | M3 | 9/16" | 1" | 1 1/8" | 1 1/16" | 221 | White | 0.17" | 1 | 00000000 | 0000 | |||||||||||||||||||||||||||||||||||||||||||||||||||||||||||||||||||||||||||||||||||||
600V AC/600V DC—85 amp per Circuit | |||||||||||||||||||||||||||||||||||||||||||||||||||||||||||||||||||||||||||||||||||||||||||||||||||
| C | 2 | 18 to 4 | Screw Terminal | 1/4" | 5/8" | 1 3/16" | 1 1/4" | 1 1/8" | 302 | Black | 0.18" | 1 | 0000000 | 0000 | |||||||||||||||||||||||||||||||||||||||||||||||||||||||||||||||||||||||||||||||||||||
Space-Saving Terminal Blocks
Mounting Holes | |||||||||||||||||||||||||||||||||||||||||||||||||||||||||||||||||||||||||||||||||||||||||||||||||||
|---|---|---|---|---|---|---|---|---|---|---|---|---|---|---|---|---|---|---|---|---|---|---|---|---|---|---|---|---|---|---|---|---|---|---|---|---|---|---|---|---|---|---|---|---|---|---|---|---|---|---|---|---|---|---|---|---|---|---|---|---|---|---|---|---|---|---|---|---|---|---|---|---|---|---|---|---|---|---|---|---|---|---|---|---|---|---|---|---|---|---|---|---|---|---|---|---|---|---|---|
No. of Circuits | For Wire Ga. | Wire Connection | Terminal Size | Terminal Ctr.-to-Ctr. | Lg. | Wd. | Ht. | Max. Temp., ° F | Color | Dia. | No. of | Each | |||||||||||||||||||||||||||||||||||||||||||||||||||||||||||||||||||||||||||||||||||||||
150V AC/150V DC—15 amp per Circuit | |||||||||||||||||||||||||||||||||||||||||||||||||||||||||||||||||||||||||||||||||||||||||||||||||||
| 2 | 22 to 16 | Screw Terminal | No. 5 | 3/8" | 1 7/16" | 9/16" | 7/16" | 302 | Black | 0.17" | 2 | 0000000 | 00000 | ||||||||||||||||||||||||||||||||||||||||||||||||||||||||||||||||||||||||||||||||||||||
600V AC/600V DC—30 amp per Circuit | |||||||||||||||||||||||||||||||||||||||||||||||||||||||||||||||||||||||||||||||||||||||||||||||||||
| 2 | 14 to 12 | Screw Terminal | No. 8 | 9/16" | 2 1/16" | 3/4" | 3/4" | 302 | Black | 0.21" | 2 | 0000000 | 00000 | ||||||||||||||||||||||||||||||||||||||||||||||||||||||||||||||||||||||||||||||||||||||
Terminal Blocks for Thermocouples
Mounting Holes | |||||||||||||||||||||||||||||||||||||||||||||||||||||||||||||||||||||||||||||||||||||||||||||||||||
|---|---|---|---|---|---|---|---|---|---|---|---|---|---|---|---|---|---|---|---|---|---|---|---|---|---|---|---|---|---|---|---|---|---|---|---|---|---|---|---|---|---|---|---|---|---|---|---|---|---|---|---|---|---|---|---|---|---|---|---|---|---|---|---|---|---|---|---|---|---|---|---|---|---|---|---|---|---|---|---|---|---|---|---|---|---|---|---|---|---|---|---|---|---|---|---|---|---|---|---|
No. of Circuits | No. of Terminals per Circuit | For Wire Ga. | Wire Connection | Terminal Size | Terminal Ctr.-to-Ctr. | Lg. | Wd. | Ht. | Max. Temp., ° F | Color | Dia. | No. of | Each | ||||||||||||||||||||||||||||||||||||||||||||||||||||||||||||||||||||||||||||||||||||||
For J Thermocouple Wire Type | |||||||||||||||||||||||||||||||||||||||||||||||||||||||||||||||||||||||||||||||||||||||||||||||||||
250V AC—20 amp per Circuit | |||||||||||||||||||||||||||||||||||||||||||||||||||||||||||||||||||||||||||||||||||||||||||||||||||
| 2 | 4 | 16 to 14 | Screw-Clamp Terminal | No. 6 | 7/16" | 2 1/2" | 1 5/16" | 1/2" | 300 | Black | 0.17" | 4 | 0000000 | 000000 | |||||||||||||||||||||||||||||||||||||||||||||||||||||||||||||||||||||||||||||||||||||
For K Thermocouple Wire Type | |||||||||||||||||||||||||||||||||||||||||||||||||||||||||||||||||||||||||||||||||||||||||||||||||||
250V AC—20 amp per Circuit | |||||||||||||||||||||||||||||||||||||||||||||||||||||||||||||||||||||||||||||||||||||||||||||||||||
| 2 | 4 | 16 to 14 | Screw-Clamp Terminal | No. 6 | 7/16" | 2 1/2" | 1 1/8" | 1/2" | 300 | Black | 0.17" | 4 | 0000000 | 00000 | |||||||||||||||||||||||||||||||||||||||||||||||||||||||||||||||||||||||||||||||||||||
For T Thermocouple Wire Type | |||||||||||||||||||||||||||||||||||||||||||||||||||||||||||||||||||||||||||||||||||||||||||||||||||
250V AC—20 amp per Circuit | |||||||||||||||||||||||||||||||||||||||||||||||||||||||||||||||||||||||||||||||||||||||||||||||||||
| 2 | 4 | 16 to 14 | Screw-Clamp Terminal | No. 6 | 7/16" | 2 1/2" | 1 5/16" | 1/2" | 300 | Black | 0.17" | 4 | 0000000 | 00000 | |||||||||||||||||||||||||||||||||||||||||||||||||||||||||||||||||||||||||||||||||||||
Plug-and-Socket Circuit Board Terminal Blocks
Pin | |||||||||||||||||||||||||||||||||||||||||||||||||||||||||||||||||||||||||||||||||||||||||||||||||||
|---|---|---|---|---|---|---|---|---|---|---|---|---|---|---|---|---|---|---|---|---|---|---|---|---|---|---|---|---|---|---|---|---|---|---|---|---|---|---|---|---|---|---|---|---|---|---|---|---|---|---|---|---|---|---|---|---|---|---|---|---|---|---|---|---|---|---|---|---|---|---|---|---|---|---|---|---|---|---|---|---|---|---|---|---|---|---|---|---|---|---|---|---|---|---|---|---|---|---|---|
No. of Circuits | For Wire Ga. | Wire Connection | Terminal Size | Terminal Ctr.-to-Ctr. | Lg. | Wd. | Ht. | Lg. | Material | Max. Temp., ° F | Color | Pkg. Qty. | Pkg. | ||||||||||||||||||||||||||||||||||||||||||||||||||||||||||||||||||||||||||||||||||||||
Plugs | |||||||||||||||||||||||||||||||||||||||||||||||||||||||||||||||||||||||||||||||||||||||||||||||||||
300V AC—18 amp per Circuit | |||||||||||||||||||||||||||||||||||||||||||||||||||||||||||||||||||||||||||||||||||||||||||||||||||
| 2 | 26 to 12 | Screw-Clamp Terminal | M3 | 3/16" | 3/8" | 1/2" | 11/16" | — | — | 220 | Black | 10 | 0000000 | 000000 | |||||||||||||||||||||||||||||||||||||||||||||||||||||||||||||||||||||||||||||||||||||
Sockets | |||||||||||||||||||||||||||||||||||||||||||||||||||||||||||||||||||||||||||||||||||||||||||||||||||
300V AC—18 amp per Circuit | |||||||||||||||||||||||||||||||||||||||||||||||||||||||||||||||||||||||||||||||||||||||||||||||||||
| 2 | — | — | — | 3/16" | 1/2" | 5/16" | 1/2" | 0.13" | Tin-Plated Nickel | 220 | Black | 10 | 0000000 | 0000 | |||||||||||||||||||||||||||||||||||||||||||||||||||||||||||||||||||||||||||||||||||||
Space-Saving Circuit Board Terminal Blocks
Pin | |||||||||||||||||||||||||||||||||||||||||||||||||||||||||||||||||||||||||||||||||||||||||||||||||||
|---|---|---|---|---|---|---|---|---|---|---|---|---|---|---|---|---|---|---|---|---|---|---|---|---|---|---|---|---|---|---|---|---|---|---|---|---|---|---|---|---|---|---|---|---|---|---|---|---|---|---|---|---|---|---|---|---|---|---|---|---|---|---|---|---|---|---|---|---|---|---|---|---|---|---|---|---|---|---|---|---|---|---|---|---|---|---|---|---|---|---|---|---|---|---|---|---|---|---|---|
No. of Circuits | For Wire Ga. | Wire Connection | Terminal Size | Terminal Ctr.-to-Ctr. | Lg. | Wd. | Ht. | Lg. | Material | Max. Temp., ° F | Color | Pkg. Qty. | Pkg. | ||||||||||||||||||||||||||||||||||||||||||||||||||||||||||||||||||||||||||||||||||||||
300V AC—15 amp per Circuit | |||||||||||||||||||||||||||||||||||||||||||||||||||||||||||||||||||||||||||||||||||||||||||||||||||
| 2 | 22 to 12 | Screw-Clamp Terminal | M3 | 3/16" | 3/8" | 3/8" | 9/16" | 0.12" | Tin-Plated Nickel | 220 | Black | 10 | 0000000 | 00000 | |||||||||||||||||||||||||||||||||||||||||||||||||||||||||||||||||||||||||||||||||||||
Touch-Safe Plug-and-Socket Terminal Blocks
Mounting Holes | |||||||||||||||||||||||||||||||||||||||||||||||||||||||||||||||||||||||||||||||||||||||||||||||||||
|---|---|---|---|---|---|---|---|---|---|---|---|---|---|---|---|---|---|---|---|---|---|---|---|---|---|---|---|---|---|---|---|---|---|---|---|---|---|---|---|---|---|---|---|---|---|---|---|---|---|---|---|---|---|---|---|---|---|---|---|---|---|---|---|---|---|---|---|---|---|---|---|---|---|---|---|---|---|---|---|---|---|---|---|---|---|---|---|---|---|---|---|---|---|---|---|---|---|---|---|
No. of Circuits | For Wire Ga. | Wire Connection | Terminal Size | Terminal Ctr.-to-Ctr. | Lg. | Wd. | Ht. | Max. Temp., ° F | Color | Dia. | No. of | Each | |||||||||||||||||||||||||||||||||||||||||||||||||||||||||||||||||||||||||||||||||||||||
Plugs | |||||||||||||||||||||||||||||||||||||||||||||||||||||||||||||||||||||||||||||||||||||||||||||||||||
600V AC/600V DC—20 amp per Circuit | |||||||||||||||||||||||||||||||||||||||||||||||||||||||||||||||||||||||||||||||||||||||||||||||||||
| 2 | 24 to 10 | Screw Terminal | M3 | 3/8" | 5/8" | 9/16" | 3/4" | 221 | White | 0.12" | 1 | 00000000 | 00000 | ||||||||||||||||||||||||||||||||||||||||||||||||||||||||||||||||||||||||||||||||||||||
Sockets | |||||||||||||||||||||||||||||||||||||||||||||||||||||||||||||||||||||||||||||||||||||||||||||||||||
600V AC/600V DC—20 amp per Circuit | |||||||||||||||||||||||||||||||||||||||||||||||||||||||||||||||||||||||||||||||||||||||||||||||||||
| 2 | 24 to 10 | Screw Terminal | M3 | 3/8" | 5/8" | 13/16" | 3/4" | 221 | White | 0.14" | 1 | 00000000 | 0000 | ||||||||||||||||||||||||||||||||||||||||||||||||||||||||||||||||||||||||||||||||||||||
Distribution Blocks
Screw-Clamp Terminal Input Connection
No. of Connections Per Circuit | |||||||||||||||||||||||||||||||||||||||||||||||||||||||||||||||||||||||||||||||||||||||||||||||||||
|---|---|---|---|---|---|---|---|---|---|---|---|---|---|---|---|---|---|---|---|---|---|---|---|---|---|---|---|---|---|---|---|---|---|---|---|---|---|---|---|---|---|---|---|---|---|---|---|---|---|---|---|---|---|---|---|---|---|---|---|---|---|---|---|---|---|---|---|---|---|---|---|---|---|---|---|---|---|---|---|---|---|---|---|---|---|---|---|---|---|---|---|---|---|---|---|---|---|---|---|
Current per Circuit, amp | Voltage | Input (For Wire Ga.) | Output (For Wire Ga.) | Wd. | Ht. | Dp. | Certification | Flammability Rating | Features | Each | |||||||||||||||||||||||||||||||||||||||||||||||||||||||||||||||||||||||||||||||||||||||||
DIN-Rail Mount | |||||||||||||||||||||||||||||||||||||||||||||||||||||||||||||||||||||||||||||||||||||||||||||||||||
2 Circuits | |||||||||||||||||||||||||||||||||||||||||||||||||||||||||||||||||||||||||||||||||||||||||||||||||||
| 175 | 600V AC/600V DC | 1 (14-2/0) | 1 (14-2/0) | 2" | 3" | 2 9/16" | UL Recognized Component, CSA Certified, CE Marked | UL 94 V-0 | Detachable Cover | 0000000 | 000000 | ||||||||||||||||||||||||||||||||||||||||||||||||||||||||||||||||||||||||||||||||||||||||
| 175 | 600V AC/600V DC | 1 (14-2/0) | 4 (14-4) | 2" | 3" | 2 9/16" | UL Recognized Component, CSA Certified, CE Marked | UL 94 V-0 | Detachable Cover | 0000000 | 00000 | ||||||||||||||||||||||||||||||||||||||||||||||||||||||||||||||||||||||||||||||||||||||||
| 175 | 600V AC/600V DC | 1 (14-2/0) | 4 (14-4) | 2" | 3" | 2 9/16" | UL Recognized Component, CSA Certified, CE Marked | UL 94 V-0 | Detachable Cover, Quick-Disconnect Load Connection | 0000000 | 00000 | ||||||||||||||||||||||||||||||||||||||||||||||||||||||||||||||||||||||||||||||||||||||||
| 175 | 600V AC/600V DC | 1 (14-2/0) | 6 (14-4) | 2" | 3" | 2 9/16" | UL Recognized Component, CSA Certified, CE Marked | UL 94 V-0 | Detachable Cover | 0000000 | 00000 | ||||||||||||||||||||||||||||||||||||||||||||||||||||||||||||||||||||||||||||||||||||||||
Stud-Terminal Input Connection
No. of Connections Per Circuit | |||||||||||||||||||||||||||||||||||||||||||||||||||||||||||||||||||||||||||||||||||||||||||||||||||
|---|---|---|---|---|---|---|---|---|---|---|---|---|---|---|---|---|---|---|---|---|---|---|---|---|---|---|---|---|---|---|---|---|---|---|---|---|---|---|---|---|---|---|---|---|---|---|---|---|---|---|---|---|---|---|---|---|---|---|---|---|---|---|---|---|---|---|---|---|---|---|---|---|---|---|---|---|---|---|---|---|---|---|---|---|---|---|---|---|---|---|---|---|---|---|---|---|---|---|---|
Current per Circuit, amp | Voltage | Input (For Wire Ga.) | Output (For Wire Ga.) | Terminal Size | Wd. | Ht. | Dp. | Certification | Flammability Rating | Features | Each | ||||||||||||||||||||||||||||||||||||||||||||||||||||||||||||||||||||||||||||||||||||||||
DIN-Rail Mount | |||||||||||||||||||||||||||||||||||||||||||||||||||||||||||||||||||||||||||||||||||||||||||||||||||
2 Circuits | |||||||||||||||||||||||||||||||||||||||||||||||||||||||||||||||||||||||||||||||||||||||||||||||||||
| 200 | 600V AC/600V DC | 1 (14-3/0) | 1 (14-3/0) | 1/4" | 2" | 3" | 2 9/16" | UL Recognized Component, CSA Certified, CE Marked | UL 94 V-0 | Detachable Cover | 0000000 | 000000 | |||||||||||||||||||||||||||||||||||||||||||||||||||||||||||||||||||||||||||||||||||||||
Surface Mount | |||||||||||||||||||||||||||||||||||||||||||||||||||||||||||||||||||||||||||||||||||||||||||||||||||
2 Circuits | |||||||||||||||||||||||||||||||||||||||||||||||||||||||||||||||||||||||||||||||||||||||||||||||||||
| 310 | 600V AC/600V DC | 1 (14-4/0) | 1 (14-4/0) | 3/8" | 3 5/8" | 4" | 3 1/2" | UL Recognized Component, CSA Certified | UL 94 V-0 | Detachable Cover | 0000000 | 00000 | |||||||||||||||||||||||||||||||||||||||||||||||||||||||||||||||||||||||||||||||||||||||
Through-Panel Terminal Blocks
For Panel Cutout | Mounting Holes | ||||||||||||||||||||||||||||||||||||||||||||||||||||||||||||||||||||||||||||||||||||||||||||||||||
|---|---|---|---|---|---|---|---|---|---|---|---|---|---|---|---|---|---|---|---|---|---|---|---|---|---|---|---|---|---|---|---|---|---|---|---|---|---|---|---|---|---|---|---|---|---|---|---|---|---|---|---|---|---|---|---|---|---|---|---|---|---|---|---|---|---|---|---|---|---|---|---|---|---|---|---|---|---|---|---|---|---|---|---|---|---|---|---|---|---|---|---|---|---|---|---|---|---|---|---|
No. of Circuits | For Wire Ga. | Wire Connection | Terminal Size | Terminal Ctr.-to-Ctr. | Lg. | Wd. | Ht. | Lg. | Ht. | Max. Temp., ° F | Color | Dia. | No. of | Each | |||||||||||||||||||||||||||||||||||||||||||||||||||||||||||||||||||||||||||||||||||||
600V AC/600V DC—60 amp per Circuit | |||||||||||||||||||||||||||||||||||||||||||||||||||||||||||||||||||||||||||||||||||||||||||||||||||
| 2 | 10 to 3 | Screw-Clamp Terminal | M5 | 5/8" | 2 3/8" | 1 13/16" | 1 3/16" | 1 3/8" | 1" | 194 | Black | 0.21" | 2 | 0000000 | 000000 | ||||||||||||||||||||||||||||||||||||||||||||||||||||||||||||||||||||||||||||||||||||
Circuit Board Terminal Blocks
Terminal Blocks | Over-Barrier Jumpers | ||||||||||||||||||||||||||||||||||||||||||||||||||||||||||||||||||||||||||||||||||||||||||||||||||
|---|---|---|---|---|---|---|---|---|---|---|---|---|---|---|---|---|---|---|---|---|---|---|---|---|---|---|---|---|---|---|---|---|---|---|---|---|---|---|---|---|---|---|---|---|---|---|---|---|---|---|---|---|---|---|---|---|---|---|---|---|---|---|---|---|---|---|---|---|---|---|---|---|---|---|---|---|---|---|---|---|---|---|---|---|---|---|---|---|---|---|---|---|---|---|---|---|---|---|---|
Pin | |||||||||||||||||||||||||||||||||||||||||||||||||||||||||||||||||||||||||||||||||||||||||||||||||||
No. of Circuits | For Wire Ga. | Wire Connection | Terminal Size | Terminal Ctr.-to-Ctr. | Lg. | Wd. | Ht. | Lg. | Material | Max. Temp., ° F | Color | Each | Pkg. Qty. | Pkg. | |||||||||||||||||||||||||||||||||||||||||||||||||||||||||||||||||||||||||||||||||||||
300V AC/300V DC—25 amp per Circuit | |||||||||||||||||||||||||||||||||||||||||||||||||||||||||||||||||||||||||||||||||||||||||||||||||||
| 2 | 22 to 12 | Screw-Clamp Terminal | No. 6 | 3/8" | 13/16" | 5/8" | 11/16" | 0.19" | Tin-Plated Brass | 230 | Black | 0000000 | 00000 | 50 | 0000000 | 000000 | |||||||||||||||||||||||||||||||||||||||||||||||||||||||||||||||||||||||||||||||||||
Terminal Blocks for RTD and Thermocouple Connection Heads
Mounting Slots | |||||||||||||||||||||||||||||||||||||||||||||||||||||||||||||||||||||||||||||||||||||||||||||||||||
|---|---|---|---|---|---|---|---|---|---|---|---|---|---|---|---|---|---|---|---|---|---|---|---|---|---|---|---|---|---|---|---|---|---|---|---|---|---|---|---|---|---|---|---|---|---|---|---|---|---|---|---|---|---|---|---|---|---|---|---|---|---|---|---|---|---|---|---|---|---|---|---|---|---|---|---|---|---|---|---|---|---|---|---|---|---|---|---|---|---|---|---|---|---|---|---|---|---|---|---|
No. of Circuits | For Max. Wire Ga. | Wire Connection | Dia. | Ht. | Wd. | Dp. | For Thermocouple Wire Type | For RTD Probe Resistance, ohm | Max. Temp., ° F | Material | Ht. | Wd. | No. of | Each | |||||||||||||||||||||||||||||||||||||||||||||||||||||||||||||||||||||||||||||||||||||
Oblong | |||||||||||||||||||||||||||||||||||||||||||||||||||||||||||||||||||||||||||||||||||||||||||||||||||
| 2 | 14 | Screw Terminal | — | 1 3/8" | 2" | 1" | J, JX, K, KK, KX, T, TX | 100; 1,000 | 1,000 | Ceramic | 3/16" | 9/16" | 2 | 00000000 | 000000 | ||||||||||||||||||||||||||||||||||||||||||||||||||||||||||||||||||||||||||||||||||||
Round | |||||||||||||||||||||||||||||||||||||||||||||||||||||||||||||||||||||||||||||||||||||||||||||||||||
| 2 | 14 | Screw Terminal | 1 15/16" | — | — | 3/4" | J, JX, K, KK, KX, T, TX | 100; 1,000 | 1,000 | Ceramic | 3/16" | 5/16" | 2 | 0000000 | 00000 | ||||||||||||||||||||||||||||||||||||||||||||||||||||||||||||||||||||||||||||||||||||
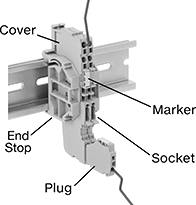
Quick-Connect Plug-and-Socket Modular DIN-Rail Mount Terminal Blocks
 |
Plugs with Spring-Clamp Terminals
No. of Circuits | No. of Terminals per Circuit | For Wire Ga. | Wd., mm | Ht., mm | Color | Each | |||||||||||||||||||||||||||||||||||||||||||||||||||||||||||||||||||||||||||||||||||||||||||||
|---|---|---|---|---|---|---|---|---|---|---|---|---|---|---|---|---|---|---|---|---|---|---|---|---|---|---|---|---|---|---|---|---|---|---|---|---|---|---|---|---|---|---|---|---|---|---|---|---|---|---|---|---|---|---|---|---|---|---|---|---|---|---|---|---|---|---|---|---|---|---|---|---|---|---|---|---|---|---|---|---|---|---|---|---|---|---|---|---|---|---|---|---|---|---|---|---|---|---|---|
300V AC/300V DC—10 amp per Circuit | |||||||||||||||||||||||||||||||||||||||||||||||||||||||||||||||||||||||||||||||||||||||||||||||||||
| 2 | 2 | 24 to 16 | 7.7 | 48.9 | Gray | 00000000 | 000000 | ||||||||||||||||||||||||||||||||||||||||||||||||||||||||||||||||||||||||||||||||||||||||||||
