


How to Install Helical Inserts
More
About Helical Insert Length
More
How to Install Key-Locking Inserts
More
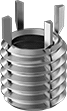
Stainless Steel Helical Inserts
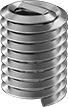
Also known as Heli-Coil inserts, these inserts have coils that expand once installed to securely anchor the insert. All have a prong for ease of installation. An installation tool grips the prong and reduces the coil diameter, enabling the insert to fit in tapped holes. Remove the prong to insert the screw. Installation requires a drill bit, a helical insert tap, an installation tool, and a prong break-off tool.
![]() For technical drawings and 3-D models, click on a part number.
For technical drawings and 3-D models, click on a part number.
Inserts | Through-Hole Taps | Closed-End Hole Taps | Installation Tools | ||||||||||
|---|---|---|---|---|---|---|---|---|---|---|---|---|---|
| Thread Size | Installed Lg. | Drill Bit Size | For Max. Hole Dia. | Specifications Met | Pkg. Qty. | Pkg. | Each | Each | Each | ||||
18-8 Stainless Steel—Right-Hand Threaded | |||||||||||||
| 9/16"-12 | 0.562" | 19/32" | 19/32" | MS122-086 | 5 | 000000000 | 000000 | 000000000 | 000000 | 000000000 | 0000000 | 000000000 | 000000 |
| 9/16"-12 | 0.844" | 19/32" | 19/32" | MS122-126 | 5 | 000000000 | 00000 | 000000000 | 00000 | 000000000 | 000000 | 000000000 | 00000 |
Stainless Steel Screw-Locking Helical Inserts
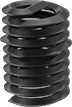
A distorted thread grips the screw to resist loosening. Also known as Heli-Coil inserts, these inserts have coils that expand once installed to securely anchor the insert. All have a prong for ease of installation. An installation tool grips the prong and reduces the coil diameter, enabling the insert to fit in tapped holes. Remove the prong to insert the screw. Installation requires a drill bit, a helical insert tap, an installation tool, and a prong break-off tool.
![]() For technical drawings and 3-D models, click on a part number.
For technical drawings and 3-D models, click on a part number.
Inserts | Through-Hole Taps | Closed-End Hole Taps | Installation Tools | ||||||||||
|---|---|---|---|---|---|---|---|---|---|---|---|---|---|
| Thread Size | Installed Lg. | Drill Bit Size | For Max. Hole Dia. | Specifications Met | Pkg. Qty. | Pkg. | Each | Each | Each | ||||
18-8 Stainless Steel | |||||||||||||
| 9/16"-12 | 0.562" | 19/32" | 19/32" | MS21209C9-10, NASM21209 | 1 | 000000000 | 00000 | 000000000 | 000000 | 000000000 | 0000000 | 000000000 | 000000 |
| 9/16"-12 | 0.844" | 19/32" | 19/32" | MS21209C9-15, NASM21209 | 1 | 000000000 | 0000 | 000000000 | 00000 | 000000000 | 000000 | 000000000 | 00000 |
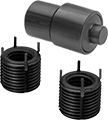
Helical Inserts with Installation Tools
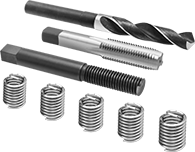
Inserts come with a through-hole tap and installation tool. Also known as Heli-Coil inserts, they have coils that expand once installed to securely anchor the insert. All have a prong for ease of installation. An installation tool grips the prong and reduces the coil diameter, enabling the insert to fit in tapped holes. Remove the prong to insert the screw.
| Thread Size | Installed Lg. | Drill Bit Size | For Max. Hole Dia. | No. of Inserts Included | Includes | Each | |
18-8 Stainless Steel—Right-Hand Threaded | |||||||
|---|---|---|---|---|---|---|---|
| 9/16"-12 | 0.844" | 19/32" | 19/32" | 6 | Drill Bit, Through-Hole Tap, Installation Tool | 000000000 | 0000000 |
18-8 Stainless Steel Key-Locking Inserts
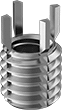
Made of stainless steel, these inserts have good corrosion resistance. Drive the keys into the surrounding material for a more secure hold than thread-locking inserts. Use them to repair or change threads in soft metals such as aluminum. Inserts may be mildly magnetic. They’re comparable to Keensert® inserts. Installation requires a drill bit, a standard tap, an installation tool, and a hammer.
Choose inserts with a thick wall for greater strength than thin-wall inserts, or to fill a large hole.
![]() For technical drawings and 3-D models, click on a part number.
For technical drawings and 3-D models, click on a part number.
Black-Phosphate Steel Key-Locking Inserts
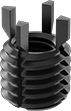
A black-phosphate finish provides mild corrosion resistance. Drive the keys into the surrounding material for a more secure hold than thread-locking inserts. Use them to repair or change threads in soft metals such as aluminum. They’re comparable to Keensert® inserts. Installation requires a drill bit, a standard tap, an installation tool, and a hammer.
Choose inserts with a thick wall for greater strength than thin-wall inserts, or to fill a large hole with stripped threads.
Inserts with an extra thick wall are stronger than thick- and thin-wall inserts. Use them to reduce the size of tapped holes.
![]() For technical drawings and 3-D models, click on a part number.
For technical drawings and 3-D models, click on a part number.
Inserts | ||||||||||
|---|---|---|---|---|---|---|---|---|---|---|
Each | Installation Tools | |||||||||
| Thread Size | For Tap Thread Size | Installed Lg. | Drill Bit Size | For Max. Hole Dia. | No. of Locking Keys | 1-9 | 10-Up | Each | ||
Black-Phosphate Steel with Thick Wall | ||||||||||
| 9/16"-12 | 3/4"-16 | 13/16" | 45/64" | 45/64" | 4 | 000000000 | 00000 | 00000 | 000000000 | 000000 |
Black-Phosphate Steel with Extra Thick Wall | ||||||||||
| 9/16"-12 | 7/8"-14 | 13/16" | 53/64" | 53/64" | 4 | 000000000 | 00000 | 00000 | 000000000 | 00000 |
Mil. Spec. Stainless Steel Key-Locking Inserts
These inserts are made to stringent military specifications. Drive the keys into the surrounding material for a more secure hold than thread-locking inserts. Use them to repair or change threads in soft metals such as aluminum. Inserts may be mildly magnetic. They’re comparable to Keensert® inserts. Installation requires a drill bit, a standard tap, an installation tool, and a hammer.
Inserts with a thin wall are often used in small holes or near the edge of a workpiece.
Choose inserts with a thick wall for greater strength than thin-wall inserts, or to fill a large hole.
![]() For technical drawings and 3-D models, click on a part number.
For technical drawings and 3-D models, click on a part number.
Inserts | Installation Tools | |||||||||
|---|---|---|---|---|---|---|---|---|---|---|
| Thread Size | For Tap Thread Size | Installed Lg. | Drill Bit Size | For Max. Hole Dia. | No. of Locking Keys | Specifications Met | Each | Each | ||
18-8 Stainless Steel with Thick Wall | ||||||||||
| 9/16"-12 | 13/16"-16 | 13/16" | 49/64" | 0.771" | 4 | MS51831-107 | 000000000 | 000000 | 000000000 | 000000 |
18-8 Stainless Steel with Extra Thick Wall | ||||||||||
| 9/16"-12 | 7/8"-14 | 13/16" | 53/64" | 0.833" | 4 | MS51832-107 | 000000000 | 00000 | 000000000 | 00000 |
Key-Locking Inserts with Installation Tool
Drive the keys into the surrounding material for a more secure hold than thread-locking inserts. These inserts are used to repair or convert threads in soft metals such as aluminum. They’re comparable to Keensert® inserts.
18-8 stainless steel inserts are more corrosion resistant than black-phosphate steel. They may be mildly magnetic.
Black-phosphate steel inserts are mildly corrosion resistant.
Choose inserts with a thick wall for greater strength than thin-wall inserts, or to fill a large hole.
![]() For technical drawings and 3-D models, click on a part number.
For technical drawings and 3-D models, click on a part number.
Key-Locking Insert Assortments with Installation Tool
These assortments include various sizes of key-locking inserts with thick and thin walls, and an installation tool. Drive the keys into the surrounding material for a more secure hold than thread-locking inserts. Use them to repair or convert threads in soft metals such as aluminum. They’re comparable to Keensert® inserts.
18-8 stainless steel inserts are more corrosion resistant than black-phosphate steel. They may be mildly magnetic.
Black-phosphate steel inserts are mildly corrosion resistant.
Choose assortments with thick-wall inserts for greater strength than thin-wall inserts, or to fill a large hole.
![]() For technical drawings and 3-D models, click on a part number.
For technical drawings and 3-D models, click on a part number.
For Tap | ||||||
|---|---|---|---|---|---|---|
| Includes | No. of Inserts Included | Thread Size | Drill Bit Size | For Max. Hole Dia. | Each | |
Inch | ||||||
18-8 Stainless Steel with Thick Wall | ||||||
| 1/4"-20 Thread × 3/8" Installed Lg. (20 Each) 5/16"-18 Thread × 0.438" Installed Lg. (15 Each) 3/8"-16 Thread × 1/2" Installed Lg. (10 Each) 7/16"-14 Thread × 5/8" Installed Lg. (10 Each) 1/2"-13 Thread × 5/8" Installed Lg. (6 Each) 9/16"-12 Thread × 0.813" Installed Lg. (5 Each) 5/8"-11 Thread × 7/8" Installed Lg. (3 Each) 3/4"-10 Thread × 1 1/8" Installed Lg. (3 Each) 7/8"-9 Thread × 1 1/4" Installed Lg. (3 Each) 1"-8 Thread × 1 3/8" Installed Lg. (2 Each) Installation Tool | 77 | 7/16"-14 1/2"-13 9/16"-12 5/8"-11 3/4"-16 7/8"-14 1 1/8"-12 1 1/4"-12 1 3/8"-12 | X 29/64" 33/64" 37/64" 45/64" 53/64" 1 1/16" 1 3/16" 1 5/16" | 0.397" 29/64" 33/64" 37/64" 45/64" 53/64" 1 1/16" 1 3/16" 1 5/16" | 000000000 | 0000000 |
Black-Phosphate Steel with Thick Wall | ||||||
| 1/4"-20 Thread × 3/8" Installed Lg. (20 Each) 5/16"-18 Thread × 0.438" Installed Lg. (15 Each) 3/8"-16 Thread × 1/2" Installed Lg. (10 Each) 7/16"-14 Thread × 5/8" Installed Lg. (10 Each) 1/2"-13 Thread × 5/8" Installed Lg. (6 Each) 9/16"-12 Thread × 0.813" Installed Lg. (5 Each) 5/8"-11 Thread × 7/8" Installed Lg. (3 Each) 3/4"-10 Thread × 1 1/8" Installed Lg. (3 Each) 7/8"-9 Thread × 1 1/4" Installed Lg. (3 Each) 1"-8 Thread × 1 3/8" Installed Lg. (2 Each) Installation Tool | 77 | 7/16"-14 1/2"-13 9/16"-12 5/8"-11 3/4"-16 7/8"-14 1 1/8"-12 1 1/4"-12 1 3/8"-12 | X 29/64" 33/64" 37/64" 45/64" 53/64" 1 1/16" 1 3/16" 1 5/16" | 0.397" 29/64" 33/64" 37/64" 45/64" 53/64" 1 1/16" 1 3/16" 1 5/16" | 000000000 | 000000 |
Black-Phosphate Steel Easy-to-Install Thread-Locking Inserts
A black-phosphate finish provides mild corrosion resistance. Also known as E-Z Lok, these inserts use Loctite® adhesive to keep them in place. The adhesive reaches full strength after 72 hours. Installation requires a drill bit and a standard tap. Then set the insert with a bolt and two nuts, or use an installation bit.
Choose inserts with a thick wall for greater strength than thin-wall inserts, or to fill a large hole.
To drive slotted inserts, you can use a slotted screwdriver instead of using an installation bit or a bolt and two nuts.
![]() For technical drawings and 3-D models, click on a part number.
For technical drawings and 3-D models, click on a part number.

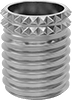
Alloy Steel Thin-Wall Swage-Locking Inserts

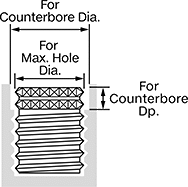
Add or repair threads near the edges and corners of soft metal surfaces—these inserts have thinner walls than any of our key-locking and thread-locking inserts. With knurls that press (swage) into the surrounding material, they won’t budge when you tighten a screw. Made of alloy steel, they’re stronger than our 17-4 PH stainless steel inserts. They absorb impact without fracturing and stand up to high-pressure applications. A cadmium plating keeps them from corroding in wet environments. On top of the plating is a dry film lubricant to help these inserts thread in without sticking. Meeting the strict standards for MIL-I-45932/1, these inserts have highly precise threads and tight tolerances.
To install these inserts, you need a drill bit, a counterbore, a standard-sized tap, an installation tool, and a hammer. Drill a hole, counterbore the top, then tap it. Place the insert into the installation tool and hand-tighten it into the tapped hole. Hammer the tool to secure the insert in place, driving the knurls into the surrounding material.
![]() For technical drawings and 3-D models, click on a part number.
For technical drawings and 3-D models, click on a part number.
17-4 PH Stainless Steel Thin-Wall Swage-Locking Inserts
Position strong, corrosion-resistant threads close to the edges of soft metal surfaces. These inserts have thinner walls than our key-locking and thread-locking inserts, so they don’t need as much space around them. Even as you tighten or loosen a screw, these inserts won’t budge—their knurls press (swage) into the surrounding material to keep them in place. They’re made of 17-4 PH stainless steel, which has the strength of steel and the corrosion resistance of 18-8 stainless steel. Manufactured to tight tolerances, these inserts meet the strict standards of MIL-I-45932/1.
To install these inserts, you need a drill bit, a counterbore, a standard-sized tap, an installation tool, and a hammer. Drill a hole, counterbore the top, and tap it. Place the insert into the installation tool, then hand-tighten it into the tapped hole. Hammer away at the tool to secure the insert and drive the knurls into the surrounding material.
![]() For technical drawings and 3-D models, click on a part number.
For technical drawings and 3-D models, click on a part number.
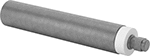
Installation Tools for Helical Inserts
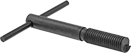
Screw an insert onto these tools and drive them a quarter to half-turn below the material’s surface. They’re compatible with helical inserts that have a prong.
![]() For technical drawings and 3-D models, click on a part number.
For technical drawings and 3-D models, click on a part number.
| For Thread Size | Style | Each | |
For Right-Hand Thread | |||
|---|---|---|---|
| 9/16"-12 | D | 000000000 | 000000 |
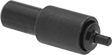
Extraction Tools for Helical Inserts
Place the tip of these tools into an insert and strike a light blow to the tool’s head. Then turn the tools counterclockwise with pressure to extract the insert.
| For Thread Size | Each | |
| 7/16"-14, 7/16"-20, 1/2"-13, 1/2"-20, 1/2"-28, 9/16"-12, 9/16"-18, 5/8"-11, 5/8"-18, 5/8"-24, 3/4"-10, 3/4"-16, 3/4"-20, 7/8"-9, 7/8"-14, 7/8"-20, 1"-8, 1"-12, 1"-14, M12, M14, M16, M18, M20, M22, M24 | 000000000 | 000000 |
Installation Tools for Key-Locking Inserts
Place the tip of these tools into an insert and strike them with a hammer to drive the keys into the material. They’re compatible with Keensert® inserts.
![]() For technical drawings and 3-D models, click on a part number.
For technical drawings and 3-D models, click on a part number.
Heavy Duty Installation Tools for Key-Locking Inserts
Install key-locking inserts, including Keensert®-style inserts. Once you screw your insert into a tapped hole, place the tip of these tools inside the insert. Strike away at the tool with a hammer to drive the insert’s keys into your material.
Choose tools that match your insert’s thread size and tap thread size.
Tools with a threaded tip or a slotted end attach to your insert, creating an easy gripping point for threading it into holes. This saves you time and effort when installing large batches of inserts. Those with a spring don’t need to be manually reset, since the spring bounces back once you strike them.
![]() For technical drawings and 3-D models, click on a part number.
For technical drawings and 3-D models, click on a part number.
Installation Bits for Slotted-Drive Inserts
For fast installation, use these installation bits with power drills and drill presses.
![]() For technical drawings and 3-D models, click on a part number.
For technical drawings and 3-D models, click on a part number.
| For Thread Size | Hex Shank Size | Each | |
| 1/2"-13, 1/2"-20, 9/16"-12, 9/16"-18, 5/8"-11, 5/8"-18, M14 | 3/8" | 000000000 | 000000 |
Installation Tools for Swage-Locking Inserts
Set swage-locking inserts into place. Use these installation tools to hand-tighten the insert into the tapped hole. Then hammer the tool to press (or swage) the knurls of the insert into the material. You should choose the tool that matches your insert’s thread size and tap thread size.
![]() For technical drawings and 3-D models, click on a part number.
For technical drawings and 3-D models, click on a part number.
| For Thread Size | For Tap Thread Size | Each | |
| 9/16"-12, 9/16"-18 | 11/16"-12 | 00000000 | 0000000 |